Apr 10, 2021
User-defined routing – Implementing and Managing Virtual Networking
User-defined routing
By default, Azure automatically creates system routes and assigns them to the different subnets within a VNet. These routes can’t be removed but can be overridden by custom routes known as User-Defined Routes (UDRs). These routes have a next hop setting that points to the next interface from a routing perspective so that traffic can be sent to the correct destination.
There are three main next hop types for system routes:
• VNet: This routes traffic betweenaddress ranges within the address space of a VNet.
• Internet: This routes traffic specifiedby the address prefix to the internet; the default route is 0.0.0.0/0, which means anything by default is routed to the internet.
• None: Traffic routed to a next hop type as none is dropped.
UDRs create a route table if you want to create custom routes. When working with UDRs, it is important to note that they support the preceding routing types as well as the following:
• VNet gateway: This is used to route trafficto a VNet gateway.
• Virtual appliance: A virtual appliance is a VM that usually acts as a firewall.
Let’s go ahead and create a UDR via the Azure portal to forward all traffic to a
VNet gateway:
- Navigate to the Azure portal by opening a web browser and navigating to https://portal.azure.com.
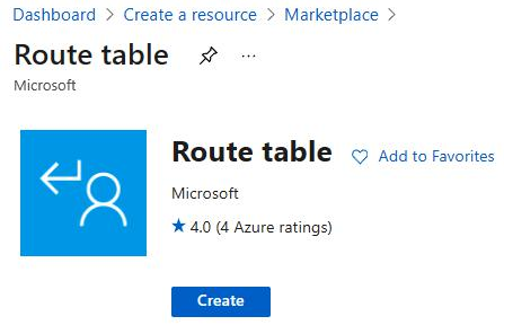
- Select Create a resource. Search for Route table and click on Create:

Figure 14.18 – Creating a new route table via the Azure portal
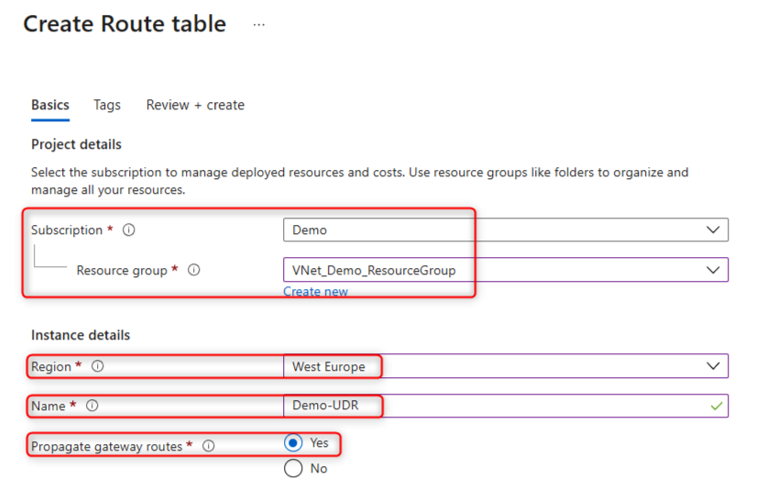
- Next, select the subscription and RG that the route table needs to be deployed to. Enter the region and name and set Propagate gateway routes to Yes:

Figure 14.19 – The route table creation configuration settings
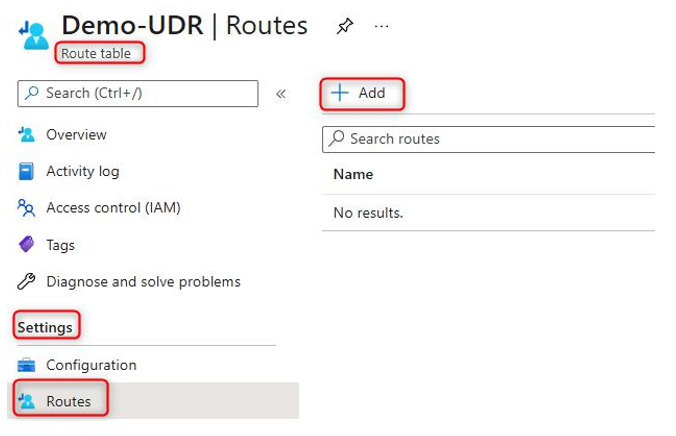
- Now that the route table has been created, you can select it, and under Settings, select Routes, and then click on Add:

Figure 14.20 – Adding a new route on the newly created route table
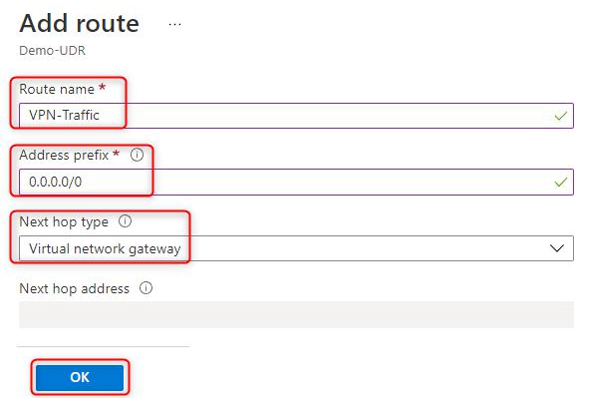
- Next, enter the route name as VPN-Traffic and the address prefix as
0.0.0.0/0 (which indicates all traffic), setNext hop type to Virtual network gateway, and click OK:

Figure 14.21 – The new route configuration settings
- Finally, we’ll have to verify whether the route is showing up under Routes:

Figure 14.22 – The newly configured route successfully created
We encourage students to read up further on Azure user-defined routing (UDRs) by visiting the following link: https://docs.microsoft.com/en-us/azure/ virtual-network/virtual-networks-udr-overview.
In this section, we created a route table with a custom route to route all traffic via the VPN gateway. Next, we are going to look at implementing subnets.
More Details