Aug 8, 2021
Creating and configuring virtual networks, including peering 2 – Implementing and Managing Virtual Networking

One of the exam objectives for this chapter is to gain the ability to configure VNet peering. VNet peering is when two or more VNets are linked with each other so that traffic can be sent from one network to another. There are two types of VNet peering:

• VNet peering: Connects VNets with the same region. There is also a cost associated with inbound and outbound data transfers for VNet peering.

• Global VNet peering: Connects VNets across different regions. This is more costly than VNet peering within the same region.

When using the Azure portal to configure VNet peering, there are a few settings that you should be aware of:

• Traffic to a remote VNet: Allows communication between two VNets, as this allows the remote VNet address space to be included as a part of the virtual-network tags.

• Traffic forwarded from a remote VNet: Allows traffic forwarded by a VNet appliance in a VNet that did not originate from the original VNet to flow via VNet peering to the other VNet.

• Virtual network gateway or Route Server: This is relevant when a VNet gateway is deployed to the VNet and needs traffic from the peered VNet to flow through the gateway.

• Virtual network deployment model: Select which deployment model you want with the peered VNet. This will either be classic or the standard resource manager method.

Let’s go ahead and configure VNet peering. To do this, we need to create another VNet first using these steps:

  1. In PowerShell, use the following command:

Connect-AzAccount

  1. Next, the following command will create another VNet, which will include a subnet that links to the VNet in the same RG that we created earlier in this chapter:

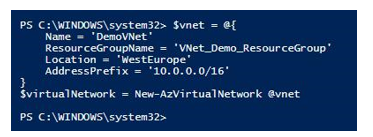
$vnet = @{

Name = ‘DemoVNet_2’

ResourceGroupName = ‘VNet_Demo_ResourceGroup’ Location = ‘WestEurope’ AddressPrefix = ‘192.168.0.0/24’
}

$virtualNetwork = New-AzVirtualNetwork @vnet $subnet = @{

Name = ‘Main_Subnet’

VirtualNetwork = $virtualNetwork

AddressPrefix = ‘192.168.0.0/24’

}

$subnetConfig = Add-AzVirtualNetworkSubnetConfig @subnet $virtualNetwork | Set-AzVirtualNetwork

  1. Sign in to the Azure portal by visiting https://portal.azure.com and navigating to the RG:

Figure 14.5 – Both VNets showing in the Azure portal

  1. Next, select DemoVNet, and under Peerings, select Add:
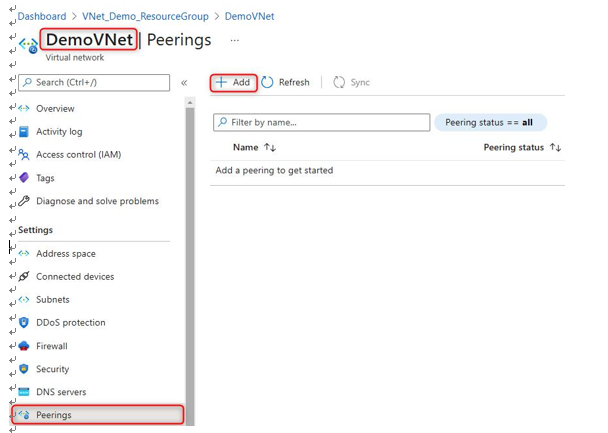
Figure 14.6 – Configuring VNet peering

  1. Next, configure the peering link name, as shown in Figure 14.7, and set the following fields as Allow (default):

I. Traffic to remove virtual network

II. Traffic forwarded from remote virtual network

III. Virtual network gateway or Route Server:
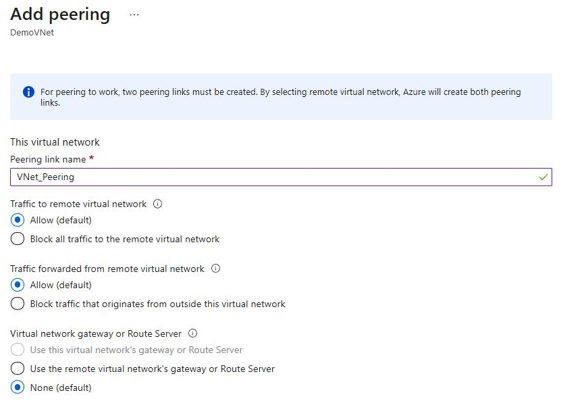
Figure 14.7 – Configuring VNet peering for DemoVNet

  1. Next, give the remote peering link a name of VNet_Peering, select the VNet, and configure the following fields as Allow (default):

I. Traffic to remove virtual network

II. Traffic forwarded from remote virtual network III. Virtual network gateway or Route Server Next, click on Add:
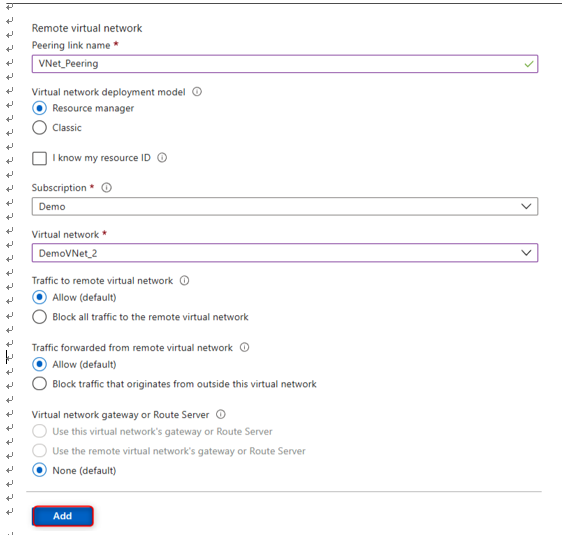
Figure 14.8 – Configuring VNet peering for DemoVNet_2

  1. Give the peering status a few minutes to enforce the peering. The final peering status will be Connected:

Figure 14.9 – Successfully configured peering between VNets

In this section, we had a look at how virtual networking works in Azure as well as how to create a VNet and subnet via PowerShell. We also had a look at how to configure VNet peering between two VNets.

We encourage you to read up on Azure virtual networking and VNet peering further by using the following links:

• https://docs.microsoft.com/en-us/azure/virtual-network/ quick-create-powershell

• https://docs.microsoft.com/en-us/azure/virtual-network/ manage-virtual-network

• https://docs.microsoft.com/en-us/azure/virtual-network/ virtual-network-peering-overview

More Details
Aug 7, 2021
Creating and configuring virtual networks, including peering – Implementing and Managing Virtual Networking

Creating and configuring virtual networks, including peering
In this section, we are going to look at how to create and configure Virtual Networks (VNets) and peering. Let’s start with an overview of VNets and IP addressing and how it works within Azure.

A VNet overview

Before we dive into how to configure VNets, let’s take a moment to understand what VNets are and what their purpose is. A VNet in Azure is a representation of your network in the cloud that is used to connect resources such as virtual machines and other services to each other.

Unlike traditional networks, which make use of physical cables, switches, and routers to connect resources, VNets are completely software-based. VNets have isolated IP ranges, and resources placed inside a VNet do not talk to the resources in other VNets by default. To allow resources in two different VNets to talk to each other, you would need to connect the VNets using VNet peering.

Important Note

All resources deployed to a VNet must reside in the same region.

An IP addressing overview

Azure supports both private and public IP addresses. Private IP addresses are assigned within the VNet in order to communicate with other resources within it and cannot be accessed via the internet by design. Public IP addresses are internet-facing by design and can be assigned to a virtual machine (VM) or other resources, such as VPN gateways.

Both private and public IP addresses can be configured to be dynamic or static. Dynamic IP addresses change when the host or resource is restarted, whereas static IP addresses do not change even if the resources are restarted.

Dynamic IP addresses are automatically assigned by Azure based on the subnet range. When a VM is deallocated (stopped), the dynamic IP address goes back into the pool of IP addresses that can be assigned to other resources again. By default, private IP addresses are dynamic but can be changed to static via the Azure portal when needed.

Static public IP addresses are random public IP addresses that do not change after being assigned to a resource. Unlike a dynamic IP address that changes when a resource is restarted, the static IP address is persisted. Public IPs are usually assigned to internet-facing resources such as VPN gateways and, in some instances, VMs.

Now that we have covered the basic networking components, let’s go ahead and configure a VNet via PowerShell:

  1. First, we need to connect to our Azure tenant by using the following PowerShell command:

Connect-AzAccount

The output appears as shown in the following screenshot:

Figure 14.1 – Connecting to the Azure tenant via PowerShell

  1. If you have multiple Azure subscriptions, you can use the following PowerShell command to select a specific subscription:

Select-AzSubscription -SubscriptionId “your-subscription-id”

  1. Now that we have selected our Azure tenant and subscription, let’s go ahead and create a new Resource Group (RG):

New-AzResourceGroup -Name VNet_Demo_ResourceGroup -Location WestEurope

The following screenshot shows the output of the command:

Figure 14.2 – A new RG is created

  1. Next, let’s create the VNet:

$vnet = @{

Name = ‘DemoVNet’

ResourceGroupName = ‘VNet_Demo_ResourceGroup’ Location = ‘WestEurope’ AddressPrefix = ‘10.0.0.0/16’

}

$virtualNetwork = New-AzVirtualNetwork @vnet

The following screenshot shows the output of the command:

Figure 14.3 – A new VNet is created

  1. Next, we need to configure a subnet range within the VNet:

$subnet = @{

Name = ‘Demo_Subnet’

VirtualNetwork = $virtualNetwork

AddressPrefix = ‘10.0.0.0/24’

Creating and configuring virtual networks, including peering 455

}

$subnetConfig = Add-AzVirtualNetworkSubnetConfig @subnet

  1. Lastly, we need to associate the newly created subnet to the VNet with the help of the following command:

$virtualNetwork | Set-AzVirtualNetwork

  1. Verify in the Azure portal that the new VNet and subnet have been created:

Figure 14.4 – The VNet and subnet showing in the Azure portal

Hint

If you are getting an error stating that scripts are disabled on your system, you can use the following PowerShell command to resolve it: set-executionpolicy unrestricted –Scope CurrentUser.

More Details