Nov 4, 2022
Configuring custom domain names – Creating and Configuring App Services

Configuring custom domain names

Custom domains allow you to connect to your web application using the public DNS name that you have chosen for your application. To do this, you need to own the respective domain and prove that you have authority over it. Your custom domain could be, for example, www.yourapp.com. There are several providers for purchasing a domain, though this is outside the scope of this book. For suggestions on getting started, you could buy directly from Microsoft, which also leverages GoDaddy. To configure a custom domain, follow these steps:

  1. Navigate to the App Service plan you worked on in the previous exercises.
  2. From the left menu blade, theSettings, click Custom domains. From the blade that appears, click + Add custom domain.
  3. Enter a Custom domain name of your choice, such as www.yourapp.com (this must be for a domain that you own). Click Validate:
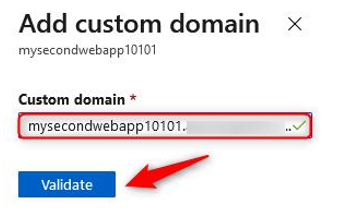
Figure 12.42 – Add custom domain

  1. You will be presented with a screen that gives you a Custom Domain Verification ID:
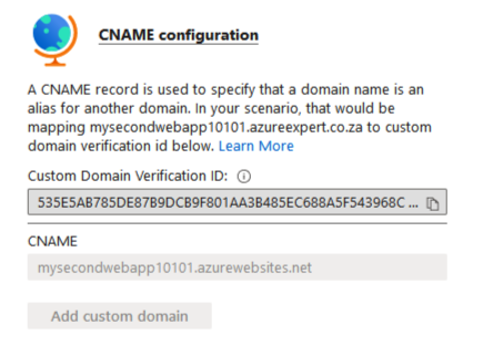
Figure 12.43 – CName configuration

Copy this ID and create a new CName and TXT record for your domain, as follows. These values will be used to determine that you have authority over the domain you have specified:
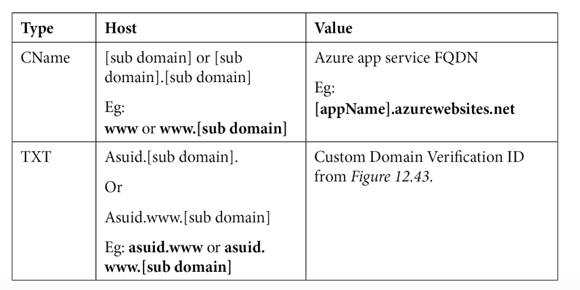
Top Tip

You can also map custom domains using A records or a wildcard (*) CNAME record. Go to https://docs.microsoft.com/en-us/azure/ app-service/app-service-web-tutorial-custom-domain?tabs=a%2Cazurecli#dns-record-types for more details.

  1. Once completed, click the Validate button again.
  2. The following screenshot shows an example of the TXT and CName records that you may have created with your domain host (all the providers have slightly different configurations):

Figure 12.44 – TXT and CName records

  1. You will get two successful messages after clicking the Validate button. Now, click Add custom domain:
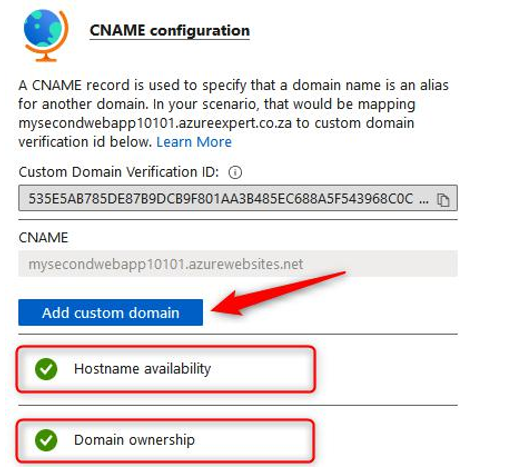
Figure 12.45 – Add custom domain

  1. With that, your custom domain has been added. However, you now have an entry on your screen that shows that this endpoint is not secure. You will need to add a certificate to make it secure. Click TLS/SSL settings from the left menu:

Figure 12.46 – Insecure custom domain

  1. Click the Private Key Certificates (.pfx) tab. Then, click + Create App Service Managed Certificate:
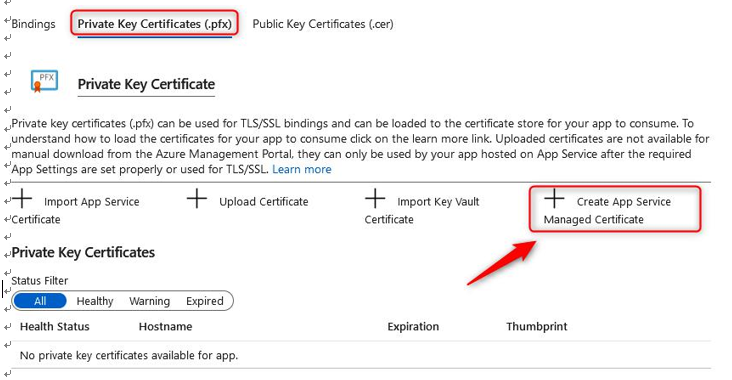
Figure 12.47 – Private Key Certificate

  1. Once Azure has analyzed the eligibility of the hostname, click Create. Azure allows one certificate per web app to be generated by the platform for your custom domain. This can save you a lot of money as, typically, you will need to procure a certificate from a third-party vendor. Your certificate will be valid for 6 months once it’s been created.
  2. DNS propagation can take up to 48 hours to occur, though sometimes, this can happen within minutes, depending on whether your DNS was used and the Time to Live (TTL) setting has been configured. You should now be able to browse your web app using the custom domain you configured. Note that you can connect using HTTPS and get a valid certificate check:
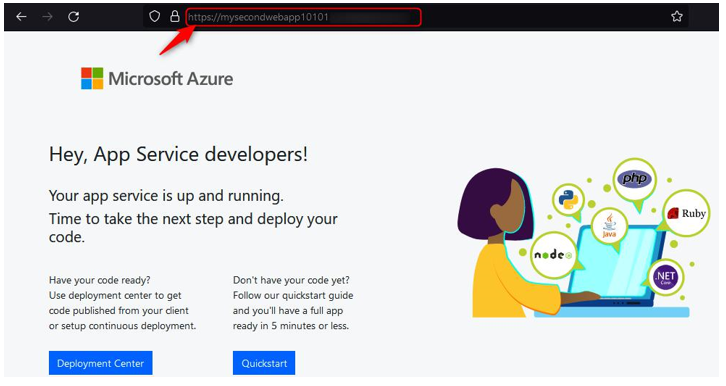
Figure 12.48 – Browsing to your custom domain

You now know how to configure a custom domain for your web app within Azure, as well as how to generate a valid certificate using the platform for a certified secure HTTPS connection. Typically, this can be done for production-based applications that are exposed to the internet and it is a common administrative duty for those that work in organizations that utilize many web applications. In the next section, you will learn how to configure backups for your applications.

More Details
Sep 4, 2022
Configuring a backup for an app service – Creating and Configuring App Services

Configuring a backup for an app service

Your application is running well, but you’re concerned that if something should fail or data is lost, you can’t restore your application. You decide that backing it up is a good idea and start to explore different ways to back up your application. Thankfully, Azure makes this a simple process, where you just need to think about what your backup strategy needs to look like and then configure the service accordingly. Remember that using a backup is different from performing DR in that DR restores operational services, whereas backups enable point-in-time restorations of data to recover from loss or accidental deletion. Follow these steps to configure a backup for your application:

  1. Navigate to the App Service plan you worked on in the previous exercises.
  2. From the left menu blade, underSettings, click Backups. From the blade that appears, click Configure at the top of the screen. The Backup Configuration blade will appear.
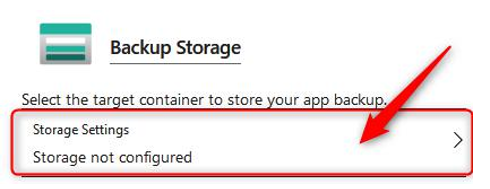
  3. You will need a storage account to store your backups. Since we haven’t pre-created an account, we will create it as part of this exercise. Click the Storage Settings button:

Figure 12.49 – Storage Settings

  1. Create your storage account and click OK. Next, you will be prompted for a container. Currently, this doesn’t exist since we created a new storage account. Click + Container, name the container backups, and click Create. Click the new container and click Select.
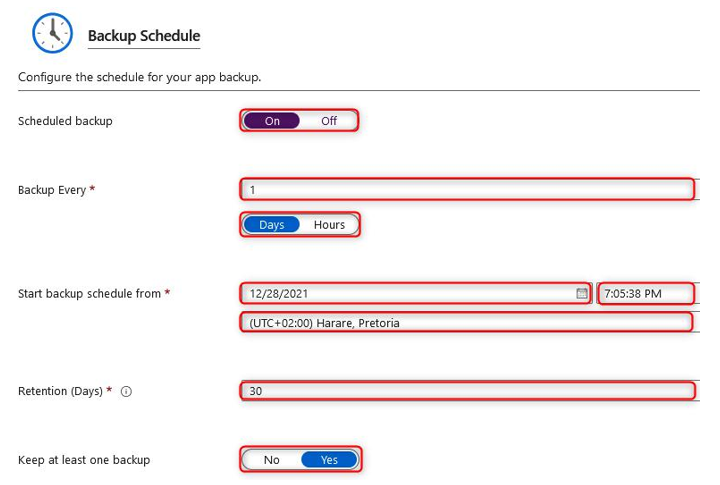
  1. For backups, you have the option to decide if you would like an automated schedule or if you would like to manually back up as and when needed. Preferably, you would like an automated schedule that prevents mistakes from occurring, such as forgetting to back up. Enable Scheduled backup. Configure your backup so that it runs every day at a set time from the date you would like this to start. In this example, we have set this to 28/12/2021 at 7:05:38 pm. Set your Retention period (in days) and set Keep at least one backup to Yes:

Figure 12.50 – Backup Schedule

  1. Note that you also have the option to configure a backup for your database. We won’t configure this for this exercise. Click Save:

Figure 12.51 – Backup Database

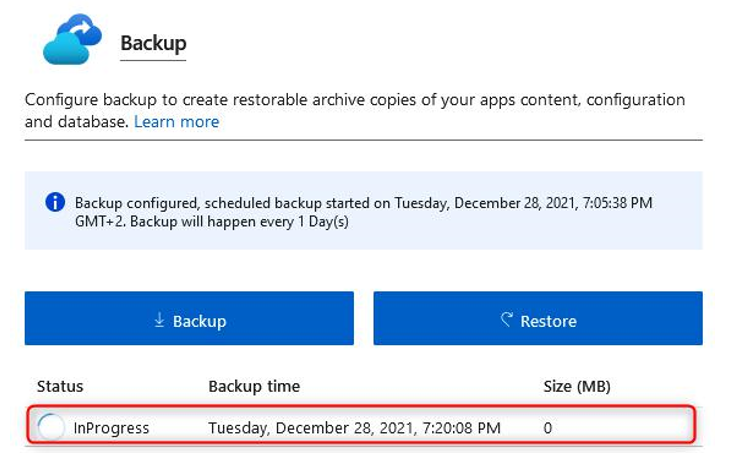
  1. You will see that your first backup is currently in progress and that the light blue box reflects the configuration for your backup schedule. You will also see two other blue buttons; the first, Backup, is for manually initiating a backup to be performed, while the other, Restore, allows you to recover data when required:

Figure 12.52 – Backup overview

You now understand how to back up your Azure App Service and should feel confident in configuring this going forward. In the next section, you will learn about the various network settings. Since we covered some of the available networking configurations in the previous sections, we will focus predominantly on how to configure a private endpoint.

More Details
Jul 14, 2022
Configuring networking settings – Creating and Configuring App Services

Configuring networking settings

You learned how to perform VNet integration in the Securing an app service section. In this section, you will learn how to configure behind a private endpoint:

  1. Navigate to the App Service plan you worked on in the previous exercises.
  2. From the left menu blade, underSettings, click Scale up (App Service plan). On the blade that appears, ensure that you have chosen the Premium V2, Premium V3, or Elastic Premium SKU to continue with this exercise. Click Apply.
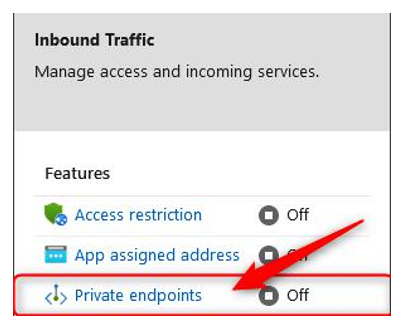
  3. From the left menu blade, underSettings, click Networking. From the blade that appears, click Private endpoints in the Inbound Traffic section:

Figure 12.53 – Private endpoints

  1. Click Add:

Figure 12.54 – Private Endpoint connections – Add

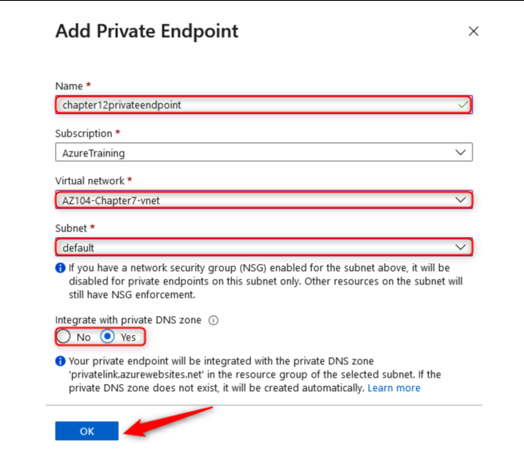
  1. Enter a Name, ensure that you have the right Subscription selected, and select the correct Virtual network your private endpoint will be connecting to. Then, select a Subnet you would like to connect to. Finally, select Yes for Integrate with private DNS zone. Thisfeature allows Azure to create a Fully Qualified Domain Name (FQDN) for your private endpoint that can be reached by your resources. If you select No, then you will need to ensure that your DNS zone is maintained by another DNS service, such as Active Directory (on-premises version), and configured on your VNet for DNS lookup queries to forward to your DNS server(s):

Figure 12.55 – Add Private Endpoint

  1. On the Private Endpoint connections screen, which you will see after deploying your resource, click on the new endpoint you have created. Click the name of your Private endpoint (where the text is highlighted in blue) to open the Private endpoint blade:

Figure 12.56 – Backup overview

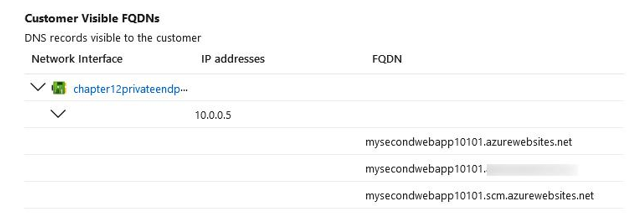
  1. From the left menu blade, under theSettings context, click Networking. From the blade that appears, scroll down to Customer Visible FQDNs and note the FQDN names associated with your service. Note that these are now associated with a private IP that belongs to the subnet you selected previously:

Figure 12.57 – Customer Visible FQDNs

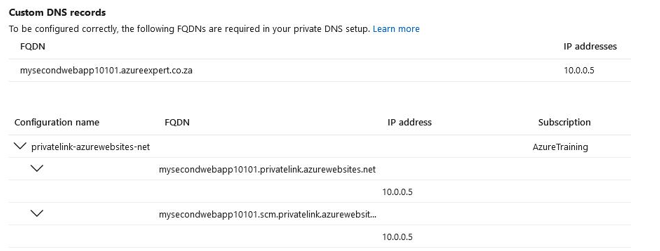
  1. Scrolling down further, you will see Custom DNS records. Note that the FQDN variable that’s been assigned is very much the same as the website FQDN you have for azurewebsites.net, except it also contains privatelink as a prefix. So, you now have an FQDN of [app name].privatelink.azurewebsites. net. This is also associated with the private IP we saw previously. Note that if you performed an NSLookup on the preceding FQDNs, you will get a public IP address for your service:

Figure 12.58 – Custom DNS records

  1. Attempting to access your site now will deliver a 403-Forbidden error since public access is now revoked:

Figure 12.59 – Error 403 – Forbidden

Top Tip

If you have applied DNS to the VNet you are associating with and have configured a private DNS zone, you will need to ensure that your DNS servers have been configured to forward lookup to Azure for the private endpoint namespace related to your service.

With that, you have just configured a private endpoint and should feel confident in how to deploy one. You are also aware of some of the DNS complexities you should look out for to ensure you can resolve the host correctly by your resources.

More Details
May 4, 2022
Configuring deployment settings – Creating and Configuring App Services

Configuring deployment settings

There are several deployment settings related to your app service that you should be aware of. These allow you to upload your code or manage source control and deployment slots.

Deployment slots are logical segmentations of your application that can pertain to different environments and versions. Let’s say you have an application that is running in production mode (meaning it’s live and operational), and you want to work on some new code updates to introduce new features to the next version of your application. Typically, you would work on this in a test environment and deploy it accordingly to the production environment, once you felt that adequate testing had been performed before deploying anything to production.

Well, deployment slots provide a solution that allows you to deploy code to these slots to test the different functions and features of your applications, as well as code updates. You can run your primary deployment slot as the native application and deploy additional slots, such as TEST, that can be used for your new code. You have the option to swap deployment slots and revert at any time. The transition period is quick and enables a different paradigm in app management. You can, for instance, switch to the TEST slot and find that your application is not connecting to the required services and is slow. In this case, you can quickly flip back to the original code you had before any changes were made.

Let’s look at a brief configuration of a deployment slot before proceeding to the next part of this section:

  1. Navigate to the App Service plan you worked on in the previous exercises.
  2. From the left menu blade, underDeployment, click Deployment slots.
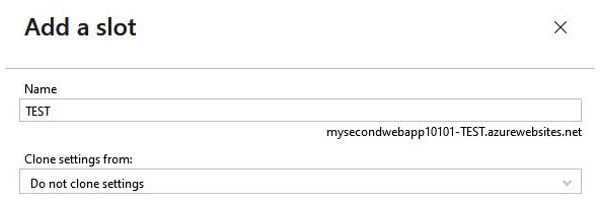
  3. From the top of the blade, click + Add Slot. Enter a Name – in this case, TEST – and leave Clone settings from set to Do no clone settings. Click Add, then Close:

Figure 12.60 – Add a slot

  1. The name you chose previously will form part of the FQDN for the deployment slot so that it can be accessed as a normal application, as shown in the preceding screenshot.
  2. Click Swap and set your Source as the new deployment slot you just created, and Target as the current slot. Click Swap, then Close:

Figure 12.61 – Swap

Now that you know about deployment slots, let’s explore the Deployment Center:

  1. Navigate to the App Service plan you worked on in the previous exercises.
  2. From the left menu blade, underDeployment, click Deployment Center. Click the Settings tab.
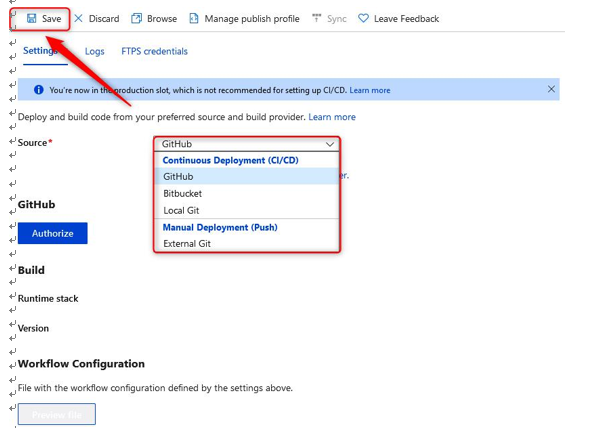
  3. Here, you have the option to deploy code from a Continuous Integration/ Continuous Deployment (CI/CD) tool. At the time of writing, the available options are GitHub, Bitbucket, and Local Git. Once you have chosen your Source CI/CD tool, you must Authorize your account and click Save:

Figure 12.62 – Deployment Center – Settings

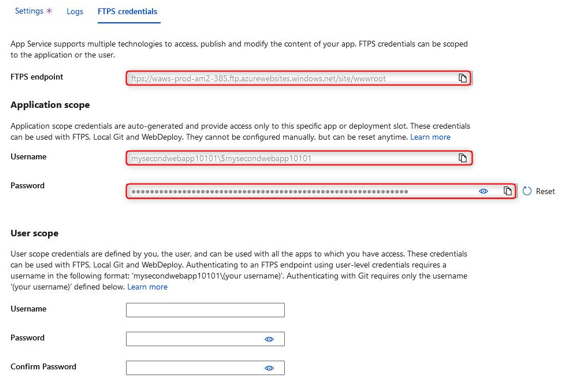
  1. Click the FTPS credentials tab and note FTPS endpoint. Application scope is an automatically generated Username and Password that’s limited to your application and deployment slot. You can use this to connect to your FTPS endpoint. You can also define a User scope and create a username and password:

Figure 12.63 – Deployment Center – FTPS credentials

With that, you have learned about the deployment settings that are available to you for your app services. You should now feel comfortable navigating this component of Azure App Service as you know where to integrate CI/CD and where to find your FTPS credentials so that you can modify your application code. Next, we will summarize what we covered in this chapter.

Summary

In this chapter, we covered what an App Service is within Azure, the role of App Service plans and why they are essential to your App Service, and how to deploy an application, including how to manage its settings and configurations and how to secure it. Then, we explored and discussed various networking configurations for your application and the considerations you need to have when configuring these settings. You should now feel confident working with applications on Azure using App Service.

In the next chapter, we will cover some examples of deploying and managing compute services within Azure. There will be a VM lab, a container lab, and an App Service lab. After following these examples, you will feel more comfortable working with Azure compute services.

More Details
Mar 4, 2022
Downloading and extracting files for labs – Practice Labs – Deploying and Managing Azure Compute Resources

Downloading and extracting files for labs

Follow these steps to download and extract the required files:

  1. Navigate to the following URL and download the archive folder (.zip): https://github.com/MicrosoftLearning/AZ-104-MicrosoftAzureAdministrator/archive/master.zip.
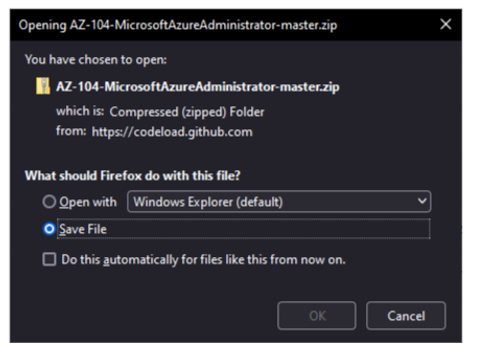
  2. Depending on the browser you are using, you will likely be presented with different versions of the following dialog. Click Save File and OK at the bottom of the screen:

Figure 13.1 – Downloading files (ZIP)

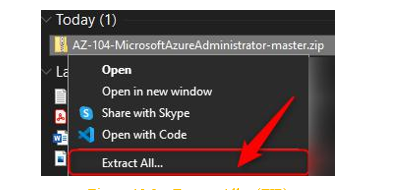
  1. Right-click the ZIP file you downloaded and click Extract All…(on Windows systems):

Figure 13.2 – Extract All… (ZIP)

  1. Navigate to your downloaded folder and follow instructions from labs when needing files that will be in that folder.

You have now downloaded all the files you need for performing the labs later in the chapter.

Managing virtual machines lab

This lab willguide you through creating standalone Virtual Machines (VMs) and VMs as a scale set, as well as exploring storage for these different deployments and how both solutions can be scaled. Furthermore, you will explore how VM custom script extension can be assigned and use to automatically configuring your VMs.

Estimated time: 50 minutes.

Lab method: PowerShell, ARM templates, and the Azure portal.

Lab scenario: In this lab, you play the role of an administrator evaluating different methods for deploying VMs for scale and resiliency. You are also exploring how VMs manage storage to support your scale. You need to determine whether standalone VMs or VMs deployed as a scale set are best suited to your deployments and understand the differences between them to ascertain when to use the different deployment types. As part of your exploration task, you want to see whether there is any mechanism that can assist you in reducing the administrative effort involved in deploying your VMs or automatically completing configuration tasks. You have heard that a custom script extension can assist with this, and you want to see how this will guide you to achieve your expected result.

Visit the following link (Lab URL) to the official Microsoft Learning GitHub labs, where you will be guided through each task step by step to achieve the following objectives.

Lab objectives:

  1. Task one: Deploy two VMs in two different zones for resiliency.

II. Task two: Use VM extensions to configure your VMs.

III. Task three: Configure and attach data disks to your VMs.

IV. Task four: Register the required resource providers for your subscription.

V. Task five: Deploy your VM scale sets.

VI. Task six: Use VM extensions to configure your scale set.

VII. Task seven: Configure autoscale for your scale set and attach data disks.

Lab URL: https://microsoftlearning.github.io/AZ-104-MicrosoftAzureAdministrator/Instructions/Labs/LAB_08-Manage_ Virtual_Machines.html.

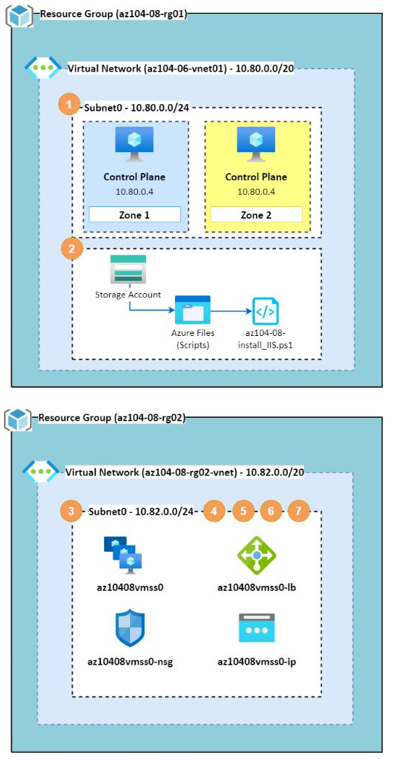
Lab architecture diagram: The following diagram illustrates the different steps and deployment components involved in the exercise. The tasks are numbered 1 to 7 to correlate with the steps in the exercise:

Figure 13.3 – Managing VMs – architecture diagrams

You have now experienced working with VMs both as individual resources and scale sets and should feel confident in working with these in your environments. It’s best practice to delete your resources from the lab to prevent unnecessary spending.

More Details
Jan 11, 2022
Deploying an Azure Container Instances lab – Practice Labs – Deploying and Managing Azure Compute Resources

Deploying an Azure Container Instances lab

This lab willguide you through creating a container group using Azure Container Instances using a Docker image and testing connectivity to your deployed containers.

Estimated time: 20 minutes.

Lab method: PowerShell and the Azure portal.

Lab scenario: In this lab, you play the role of an administrator who is looking to reduce their container management activities. Your organization, Contoso, has several virtualized workloads, and you want to explore whether these can be run from Azure Container Instances using Docker images.

Visit the following URL to the official Microsoft Learning GitHub labs, where you will be guided through each task step by step to achieve the following objectives.

Lab objectives:

I.  Task one: Use Azure Container Instances to host your container.

II. Task two: Confirm connectivity to your container and functionality.

Lab URL: https://microsoftlearning.github.io/AZ-104-MicrosoftAzureAdministrator/Instructions/Labs/LAB_09b-Implement_Azure_Container_Instances.html.

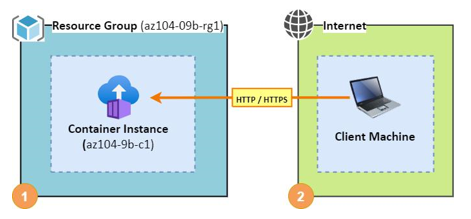
Lab architecture diagram:

The following diagram illustrates the different steps involved in the exercise:

Figure 13.4 – Deploying an Azure container instance – architecture diagram

After running through this lab, you should now feel confident to deploy container instances to Azure. The next lab will take you through using Azure Kubernetes Service for the orchestration of your container instance deployments.

Deploying an Azure Kubernetes Service lab

This labwill guide you through setting up an Azure Kubernetes Service instance and deploying an NGINX pod for your multi-tier applications. You will implement node scaling as part of the exercise and learn to leverage Kubernetes as an orchestration service in Azure.

Estimated time: 40 minutes.

Lab method: PowerShell and the Azure portal.

Lab scenario: In this lab, you play the role of an administrator who is looking to reduce container management activities and implement container orchestration services. Your organization, Contoso, has several multi-tier applications that are not suitable for Azure Container Instances. You want to explore running these through Kubernetes, and since Azure has Azure Kubernetes Service (AKS), you want to leverage this to minimize administrative effort and complexity in deploying your solution.

Visit the following URL to the official Microsoft Learning GitHub labs, where you will be guided through each task step by step to achieve the following objectives.

Lab objectives:

  1. Task one: Register the required resource providers for your subscription.

II. Task two: Deploy AKS.

III. Task three: Deploy your AKS pods.

IV. Task four: Configure scaling for your AKS cluster.

Lab URL: https://microsoftlearning.github.io/AZ-104-MicrosoftAzureAdministrator/Instructions/Labs/LAB_09c-Implement_Azure_Kubernetes_Service.html.

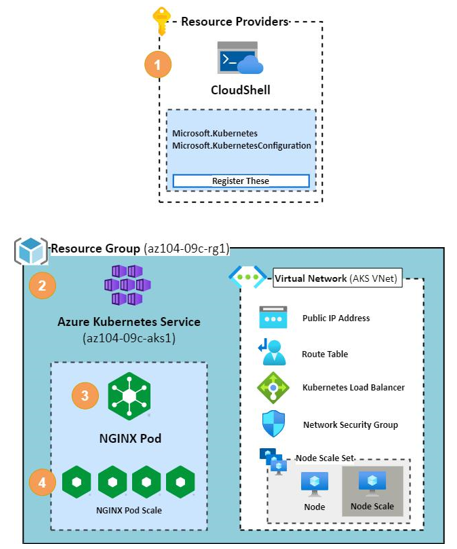
Lab architecture diagram:

The following diagram illustrates the different steps involved in the exercise:

Figure 13.5 – Deploying an Azure container instance – architecture diagram

After working through these previous labs, you should feel confident working with containers on Azure. You are also familiar with some aspects of the Kubernetes service, which can be used for the orchestration of your container instances. You’ve also experienced managing scale using these tools and will be prepared for performing this aspect of your role going forward. The next lab will explore working with Web App service on Azure.

More Details