Jul 14, 2022
Configuring networking settings – Creating and Configuring App Services
Configuring networking settings
You learned how to perform VNet integration in the Securing an app service section. In this section, you will learn how to configure behind a private endpoint:
- Navigate to the App Service plan you worked on in the previous exercises.
- From the left menu blade, underSettings, click Scale up (App Service plan). On the blade that appears, ensure that you have chosen the Premium V2, Premium V3, or Elastic Premium SKU to continue with this exercise. Click Apply.
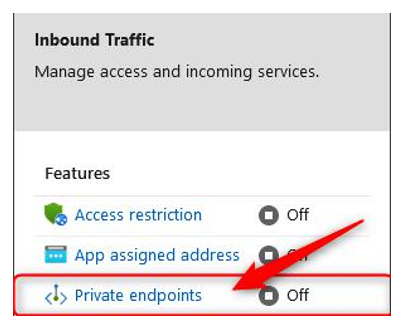
- From the left menu blade, underSettings, click Networking. From the blade that appears, click Private endpoints in the Inbound Traffic section:

Figure 12.53 – Private endpoints
- Click Add:

Figure 12.54 – Private Endpoint connections – Add
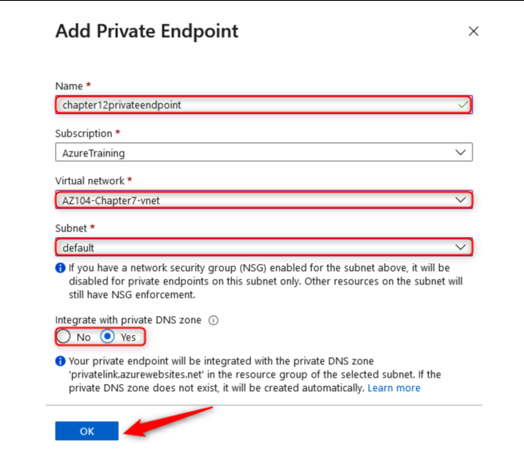
- Enter a Name, ensure that you have the right Subscription selected, and select the correct Virtual network your private endpoint will be connecting to. Then, select a Subnet you would like to connect to. Finally, select Yes for Integrate with private DNS zone. Thisfeature allows Azure to create a Fully Qualified Domain Name (FQDN) for your private endpoint that can be reached by your resources. If you select No, then you will need to ensure that your DNS zone is maintained by another DNS service, such as Active Directory (on-premises version), and configured on your VNet for DNS lookup queries to forward to your DNS server(s):

Figure 12.55 – Add Private Endpoint
- On the Private Endpoint connections screen, which you will see after deploying your resource, click on the new endpoint you have created. Click the name of your Private endpoint (where the text is highlighted in blue) to open the Private endpoint blade:

Figure 12.56 – Backup overview
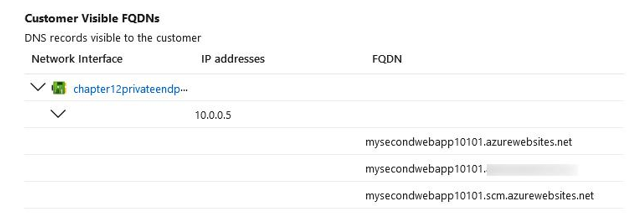
- From the left menu blade, under theSettings context, click Networking. From the blade that appears, scroll down to Customer Visible FQDNs and note the FQDN names associated with your service. Note that these are now associated with a private IP that belongs to the subnet you selected previously:

Figure 12.57 – Customer Visible FQDNs
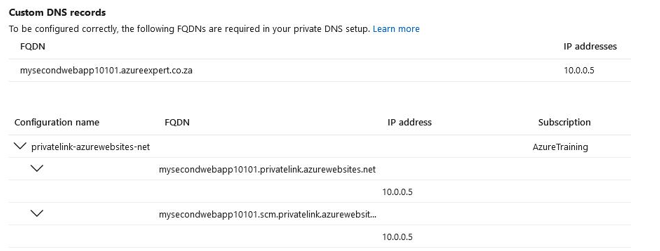
- Scrolling down further, you will see Custom DNS records. Note that the FQDN variable that’s been assigned is very much the same as the website FQDN you have for azurewebsites.net, except it also contains privatelink as a prefix. So, you now have an FQDN of [app name].privatelink.azurewebsites. net. This is also associated with the private IP we saw previously. Note that if you performed an NSLookup on the preceding FQDNs, you will get a public IP address for your service:

Figure 12.58 – Custom DNS records
- Attempting to access your site now will deliver a 403-Forbidden error since public access is now revoked:

Figure 12.59 – Error 403 – Forbidden
Top Tip
If you have applied DNS to the VNet you are associating with and have configured a private DNS zone, you will need to ensure that your DNS servers have been configured to forward lookup to Azure for the private endpoint namespace related to your service.
With that, you have just configured a private endpoint and should feel confident in how to deploy one. You are also aware of some of the DNS complexities you should look out for to ensure you can resolve the host correctly by your resources.
More Details