Jan 15, 2023
Securing an app service 4 – Creating and Configuring App Services
  1. The next configuration for inbound traffic isApp assigned address. Clicking this option will take you to the TLS/SSL settings blade. This is used to determine your Custom Domain, which we will configure in the next section. This is another method of enhancing security as the domain can be configured to something that is trusted by your organization or users. It will confirm that you are using certificate delivery to enhance the security of your application:
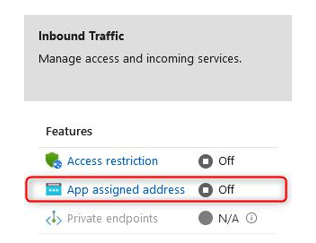
Figure 12.35 – Network settings – Inbound Traffic 2

  1. The last inbound configuration option is Private endpoints. Selecting this allows you to completely remove all public access to your application. Your application will be assigned an NIC with a private IP from the associated VNet and subnet you connect it to. To enable public access for this configuration, you would need some form of network address translation (NAT) configuration to reach your application. This can be achieved by deploying an Application Gateway or using Azure Front Door, or by using your firewall service to translate traffic from one of its public IP addresses to your application over the private endpoint. This is a great way to secure traffic to your application, but as you can see, it can quickly cause complications. This setting will force you to consider how other components of your application communicate with each other and the outside world.
  2. For outbound communication, you can perform VNet integration, which will associate your application with a designated subnet. Note that to assign a web app to a subnet, it will need to assume delegated access for the subnet. This means that it can manage the DHCP deployment for the subnet and will be responsible for IP assignment on the subnet. Furthermore, it restricts what can access the subnet and limits you to which subnet can be used for what service as only a single service can have delegated administration. Note that this is for outbound communication only and will not protect inbound communication. The subnet should also be allowed to communicate with the relevant services within Azure. Click VNet integration:
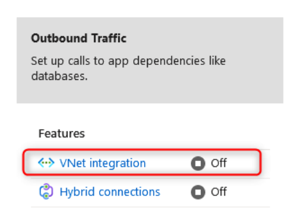
Figure 12.36 – Network settings – Outbound Traffic 1

  1. Click + Add VNet:

Figure 12.37 – VNet Configuration

  1. You can also select an appropriate Virtual Network, which will give you the option to either create a new subnet or use an existing one. Use whichever best suits this demo and click OK:
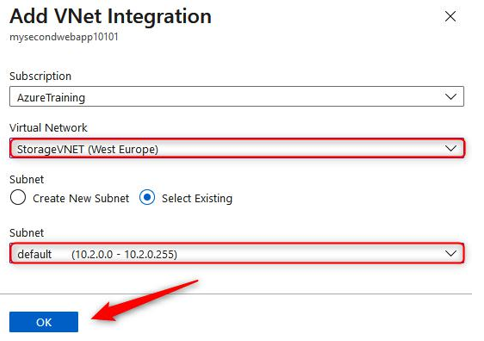
Figure 12.38 – Add VNet Integration

Note that your application is now connected to the VNet and subnet you selected. Note the address details as well. Traffic from your application can now be controlled for outbound traffic using user-defined routes (UDRs) on the network:
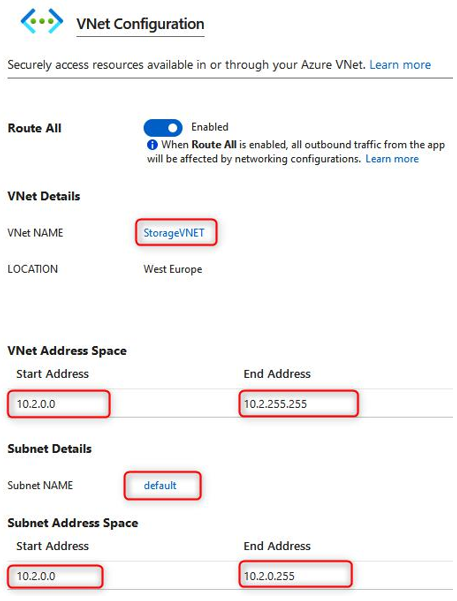
Figure 12.39 – VNet Configuration

  1. The last configuration item for outbound traffic isHybrid connections. This feature is a service that enables endpoint connectivity for your application and provides
    a connection solution where you don’t have direct access paths to your on-premises environments or other environments from Azure. It enables a mechanism for TCP communication that’s mapped to a port number for that corresponding system or service. Each hybrid connection is associated with a single host and port that enhances security as it’s easier to manage and correlate the traffic:
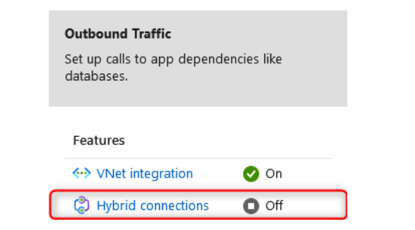
Figure 12.40 – Network settings – Outbound Traffic 2

The final security configuration item to be aware of is the CORS option under API context on the left menu pane. CORS should be disabled unless it’s required as it exposes more vulnerabilities to your application, especially when it’s not managed correctly:
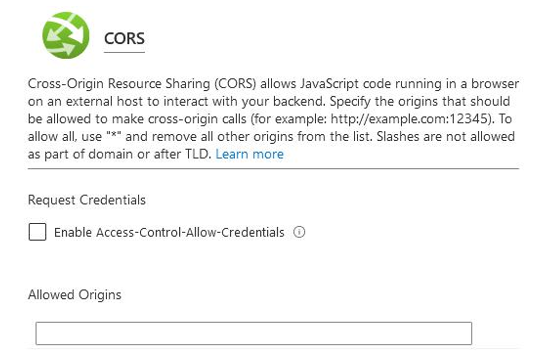
Figure 12.41 – Network settings – CORS

Now that you have reviewed the different security settings, you should feel more familiar with the controls that are available and when to use them. It’s especially important to understand the configurations that are relative to traffic flow. In the next section, you will learn how to configure custom domain names.

More Details
Jan 12, 2023
Securing an app service 3 – Creating and Configuring App Services
  1. You can also consider using backups and disaster recovery (DR) for your applications. But why? If your application becomes compromised and you need to perform restoration tasks, without backups, you would potentially lose all your critical data. Therefore, anything that could cause the application to go offline or become inaccessible would compromise the security of the application. The same is true for DR; if you can’t restore an active instance of the application, its security is compromised as potential usage of the application will be restricted, which could lead to several other issues for an organization and a loss of revenue.
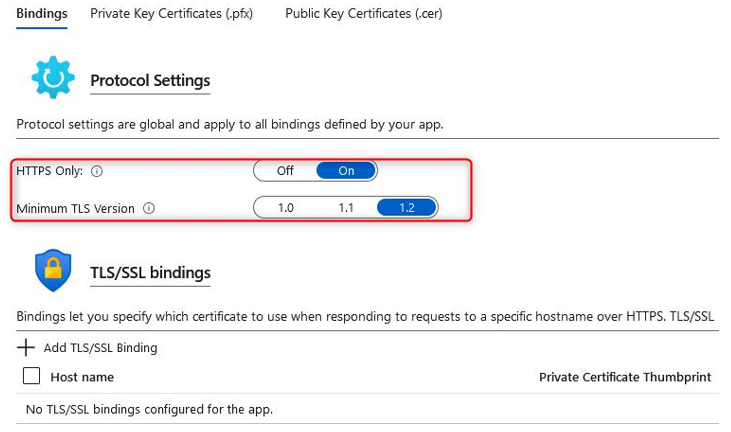
  2. The next menu you should click through is TLS/SSL settings. On this blade, select the Bindings tab and ensure that HTTPS Only is set to On. This ensures that all your traffic is encrypted and secured to the application, where HTTP traffic allows compromises to occur and should always be configured to forward all HTTP requests to HTTPS. HTTP communicates in clear text, so any credentials or sensitive information that’s sent would be visible to anyone that could intercept the traffic, which is highly insecure. HTTPS requires a certificate, which can be configured within the same blade. Azure offers one free certificate per web application for a single domain:

Figure 12.31 – Protocol Settings – TLS/SSL bindings

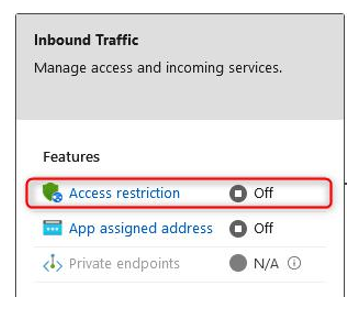
  1. Next, click on the Networking option from the left menu of the application. Networking is an interesting topic for your applications and can result in many sleepless nights if it’s not planned and managed correctly. The rule of thumb for hardening your network is to secure your perimeters and isolate traffic via perimeters, as well as by adopting the Zero Trust model (where you don’t trust any application or service that doesn’t intend to communicate with the application). It should only be public-facing if your application requires public access. You will also want to consider a Web Application Firewall (WAF) and firewall service for public traffic, as well as something internal. Azure provides several options for privatizing traffic for your application and it’s important to understand your traffic flow when you’re considering your implementation. The first item you must configure here is Access restriction, which applies to inbound traffic. This will act as a whitelist or blacklist for your traffic, depending on how you configure your rules. To configure this, click Access restriction:

Figure 12.32 – Network settings – Inbound Traffic 1

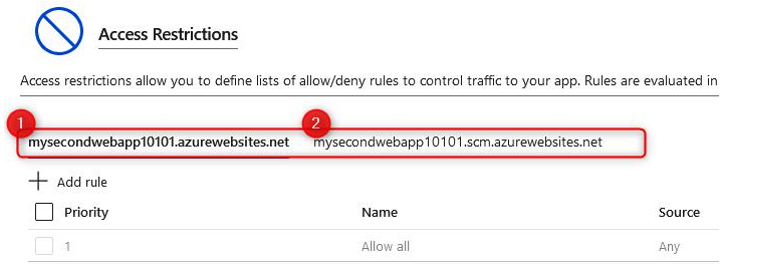
  1. As the most secure option, you should restrict all traffic except for your allowed rules. You will notice that you can configure your restriction rules for two different endpoints. The first is the public endpoint for your application, while the second has a suffix starting withscm, which is used for the Kudu console and web deployments. To see the available configuration options, click + Add rule:

Figure 12.33 – Network settings – Access Restrictions

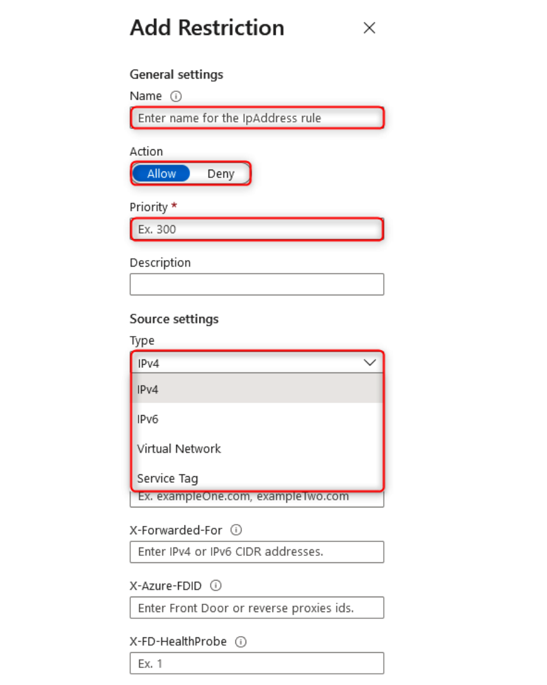
  1. On the Add Restriction pane that appears, you can set a Name; enter something meaningful. Next, you must decide on an Action, which can be either Allow
    or Deny; click Allow. You can also enter a Priority and, optionally, a Description. The next option, Type, is very important as it is used to determine the type of restriction that’s being implemented and how the rule is invoked. The default configuration is IPv4, which is limited to a known IPv4 address or range (usually a public address or range) and is added to the IP Address Block text box. When entering a range, you can enter it in CIDR notation, with a single IP being /32 for the CIDR. Enter an IP address. IPv6 works in the same fashion except for IPv6 addresses or ranges. The Virtual Network source option allows you to select a network that you have configured previously to allow traffic through. The final option is Service Tag. Click Add rule:

Figure 12.34 – Add Restriction

More Details
Jan 11, 2023
Securing an app service 2 – Creating and Configuring App Services
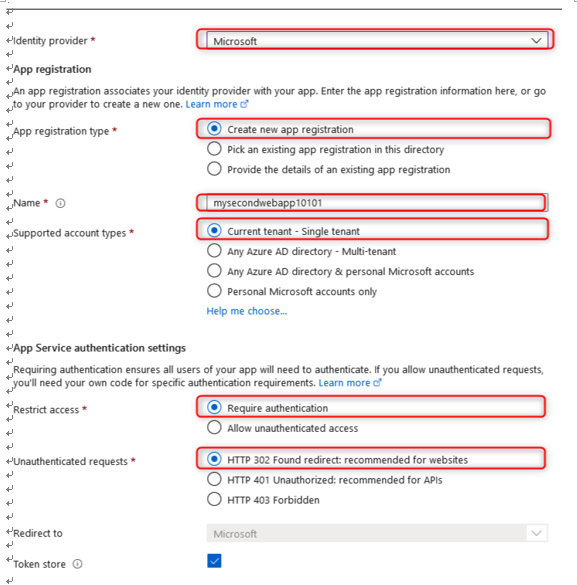
  1. You will see a screen with additional configuration settings. The first item to configure is the application registration. This can be used to assign permissions and will configure a service principal account in Azure AD called an app registration. For this exercise, select Create new app registration and assign a name. Next, select the option for supported account types for your application. Depending on how and where your application is used, this will dictate the configuration that best suits your security requirements. For instance, if you are looking to deliver an internal application such as something that lists the mobile numbers of employees within your organization so that you can contact someone urgently (where sharing this information is disallowed publicly), then you would want to restrict public access (that is, anyone external to your organization).

Using your identity provider will help you determine if they have an account with your organization or not. In such cases, you can select Current tenant – Single tenant. Any Azure AD direction – Multi-tenant will allow you to accept user logins from any other Azure AD directory. The next option, Any Azure AD directory & personal Microsoft accounts, opens access to public accounts too, where personal accounts can be used. Finally, Personal Microsoft accounts only removes access from other Azure accounts and limit this to personal Microsoft accounts. This is typically used for gaming services, whereyou want to allow friends to connect but you also want to restrict business accounts from accessing the service. As you can see, the most secure option is Current tenant – Single tenant. You can also configure Restrict access, where you can force authentication to be conducted before access is granted to your application. Unauthenticated access allows users to log in anonymously. Choose Require authentication since this is the most secure option. Finally, you can choose what kind of error handling you would like to deliver upon detection, such as delivering an HTTP 401 Unauthorized error message. Select HTTP 302 Found redirect. Then, click Next : Permissions >:

Figure 12.27 – Identity provider configuration

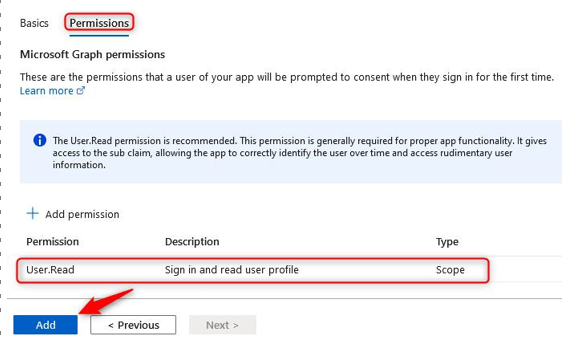
  1. The next blade relates to the Permissions options you would like to grant. The default option is User.Read, which allows the application to read the user’s profile. These permissions can be modified as needed to deliver the required information to your application. These permissions will be prompted by the user when they access the application and are being authenticated. They will need to consent to this permission request if they wish to access the application. Click Add:

Figure 12.28 – Identity provider – Permissions

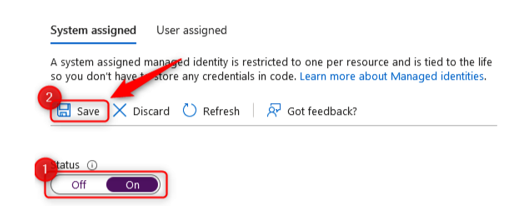
  1. Click Identity from the left menu pane for the application. You will be presented with two tabs – System assigned and User assigned. Here, you can choose which deployment configuration you would like to use. System assigned allows you to create a managed identity whose life cycle is controlled and managed by Azure. A managed identity allows you to grant RBAC permissions to the application as if it were a user, which gives them better control over resources and prevents user management issues such as abuse of privileges or mistakes being made. Enabling this setting increases the security of your application and prevents credentials from being injected directly into code, which would allow account and system compromise to occur. User assigned is managed manually but can be configured more granularly for control over the specific RBAC permissions you would like to grant to the application. On the System assigned tab, click On under the Status option, then click Save:

Figure 12.29 – System assigned

  1. After clicking Save, you will see a new configuration option, where you can configure the Azure RBAC permissions for your application:

Figure 12.30 – Adding a role assignment

More Details
Jan 10, 2023
Securing an app service – Creating and Configuring App Services

Securing an app service

There are several mechanisms you can use to enhance the security of your application on Azure. As part of the AZ-104 exam, we will explore the configuration options that are native to the web application directly. However, note that for real-world implementations, you should investigate additional measures for enhancing the security of your applications, such as employing a firewall – especially a web application firewall – for your web-based applications. These services provide traffic that’s in line with your application and scan for disallowed or heuristic behavior.

In this exercise, we will look at various native application configurations that can be used to increase the security level of your app services:

  1. Navigate to the App Service plan you worked on in the previous exercise.
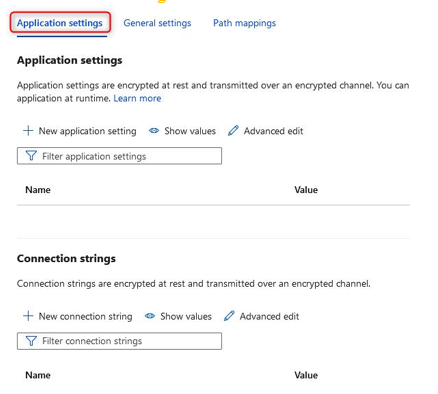
  2. From the left menu blade, under theSettings context, click Configuration. The first tab you will be greeted with is called Application settings. Application settings are variables that are presented securely to your application, but they can be configured externally from the application code. This enhances security by obfuscating the password from code and prevents developers that don’t have RBAC permissions on the Azure portal for the App Service resource from seeing sensitive data, such as secrets that may be stored under Application settings. The other item that can be configured is Connection strings:

Figure 12.22 – Application settings

  1. The next tab is General settings. Here, you will want to ensure File Transfer Protocol (FTP) traffic is conducted securely if it’s allowed by your organizational policies. FTP is a technology that enables file transfer operations for your systems. It is commonly used by developers to upload code to the system; an alternative, as we explored in the previous chapter, is to use a source code repository such as Git. The most secure option is to disallow all FTP-based traffic as prevention is better than a cure. However, since many applications require developers to be able to upload their code, changing the FTP transfer protocol that’s being used is the next best option. Setting traffic to FTPS only ensures that the FTP traffic is conducted over an HTTPS tunnel, meaning that all the data is encrypted. So, even if it is intercepted, it is less likely to be compromised. Set this to FTPS only for
    this exercise:

Figure 12.23 – FTP state

  1. Click Save at the top of the screen:

Figure 12.24 – Options menu

Note that after clicking Save, you will be warned that the application needs to be restarted.

  1. The last tab that can be configured in the General settings menu is Path mappings. We won’t explore this here.
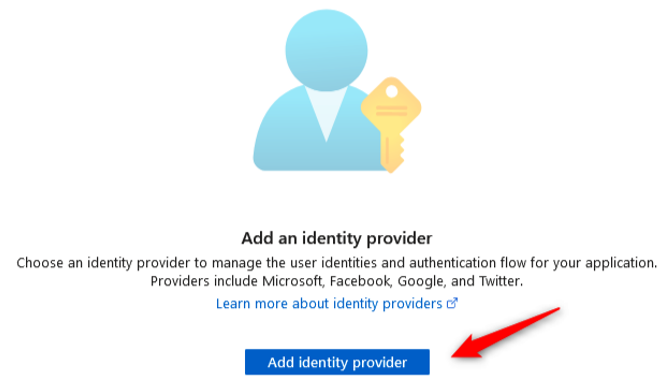
  2. From the left menu pane, clickAuthentication. This blade contains the configuration settings related to authentication, the type of identity provider service that’s being used, and the authentication flow. To explore the available configurations, click Add identity provider:

Figure 12.25 – Add identity provider

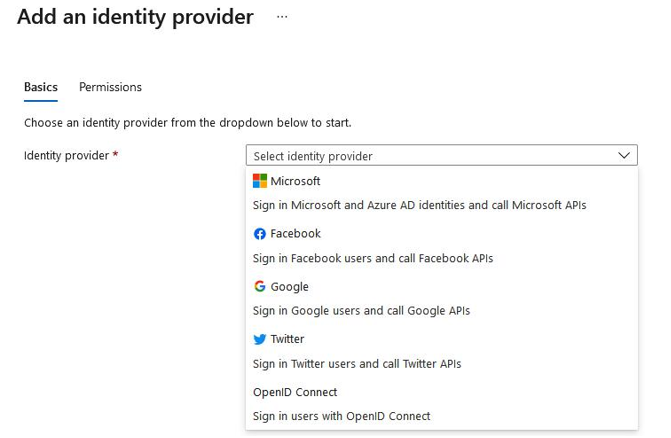
  1. At the time of writing, you can choose from several identity providers – that is, Microsoft, Facebook, Google, Twitter, and OpenID Connect. ClickMicrosoft:

Figure 12.26 – Add an identity provider

More Details