Mar 4, 2023
PowerShell scripts 2 – Creating and Configuring App Services
Here, you scaled down your application from the S1 SKU to the B1 SKU, which shows how easy it is to change its size. Note that the application will restart upon being resized. You will need to resize the application so that it’s a production SKU for the next exercise. When changing its size, select Production and click See additional options. Click S1 and then Apply:
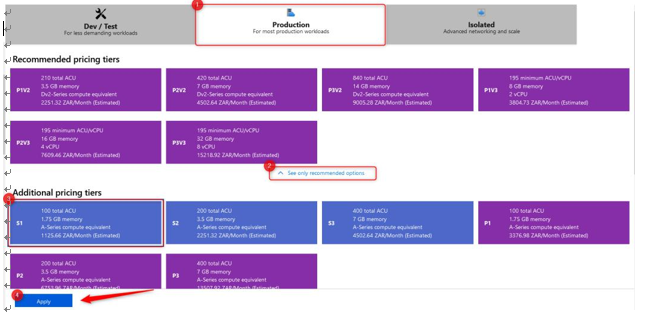
Figure 12.13 – Scaling up to S1
Now, let’s learn how to scale out horizontally:
- Navigate to the App Service plan you worked on in the previous exercise.
- From the left menu blade, under theSettings context, click Scale out (App Service plan).
- Note that you can choose either Manual scale or Custom autoscale. Here, it would be best to manually scale since you are working on Dev / Test workloads, but for production workloads, you should choose Custom autoscale. Change Instance count to 2 and click Save:
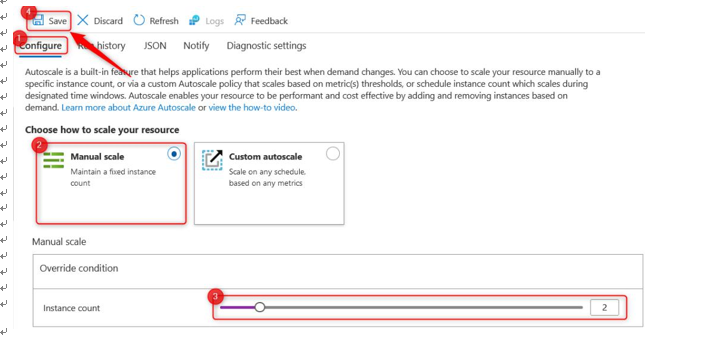
Figure 12.14 – Manual scale
- Now, change the setting to Custom autoscale. Enter a name for your Autoscale setting name and select your Resource group:
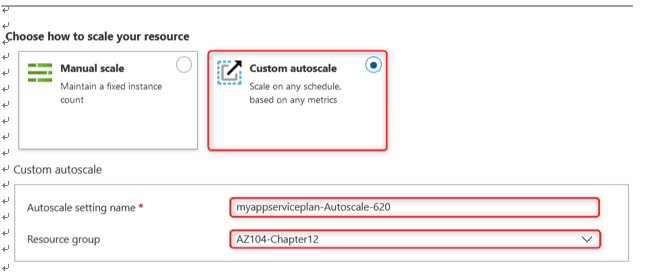
Figure 12.15 – Custom autoscale
For our Default scale condition, we will create the first one using Scale based on a metric for Scale mode, and we will set Instance limits to 1 for Minimum, 2 for Maximum, and 1 for Default. Then, click Add a rule:
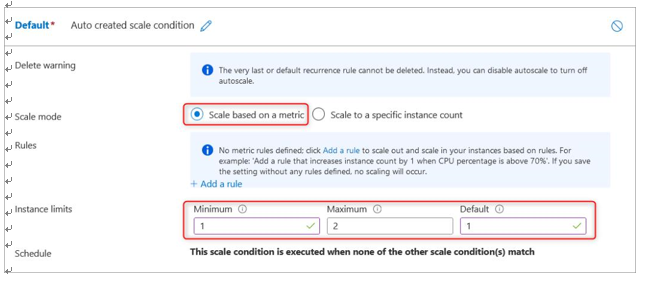
Figure 12.16 – Scale condition setup
- For the Criteria section, set Time aggregation to Average, Metric namespace to App Service plans standard metrics, and Metric name to CPU Percentage. Set Operator to = and Dimension Values to All values (this means any web app).
Note the timeline chart at the bottom of the screen, which indicates the average CPU percentage that you have experienced over time, with the average also written below it. In this case, it is 3.78 %:
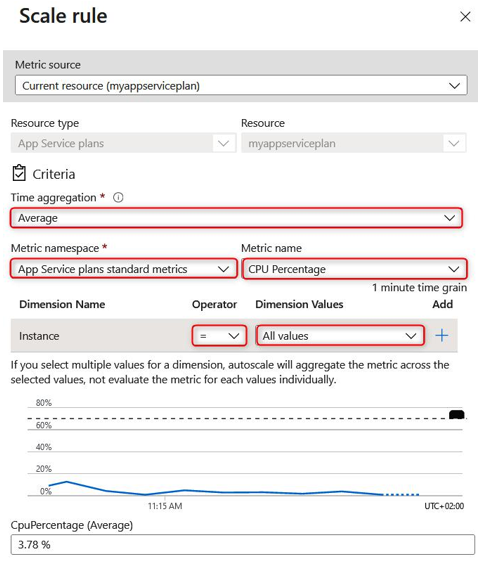
Figure 12.17 – Scale rule
- Below the CPUPercentage (Average) section, you will notice some other configuration options. Set Operator to Greater than and Metric threshold to trigger scale action to 70. Then, set Duration (minutes) to 10 and Time grain statistic to Average. This will define a rule that states that when the CPU average percentage reaches greater than 70% usage over 10 minutes, it will trigger an Action.
- For the Action section, set Operation to Increase count by, Cool down (minutes) to 5, and Instance count to 1. This will increase the instance count of the running web applications by 1 when the criteria that we configured in step 7 have been identified. Once triggered, a cooldown period will occur, where no further actions can be performed until the cooldown window has elapsed. In this case, it is 5 minutes. If the criteria for scaling are observed again after this cooldown period, then the action will be triggered again. Click Add:
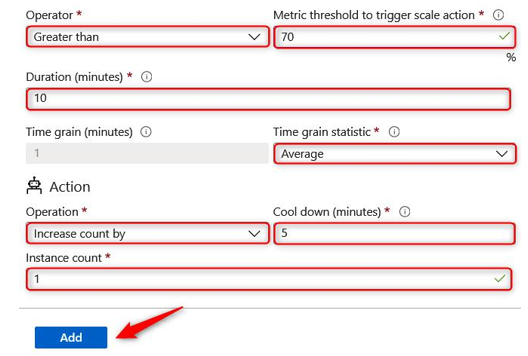
Figure 12.18 – Configuring a scale rule – Thresholds
- You have just configured a rule for scaling your application up in terms of its instance count, but what if you would like the application to scale back down when you don’t need as many instances anymore? You would need to configure a new scale condition to trigger a scale-down action you would like to perform. Click + Add a rule below the Scale out rule you just created:

Figure 12.19 – Add a rule
- For the Criteria section, set Time aggregation to Average, Metric namespace to App Service plans standard metrics, and Metric name to CPU Percentage. Set Operator to = and Dimension Values to All values (this means any web app).
Note that the timeline chart at the bottom of the screen indicates the CPU percentage average that you have experienced over time, with the average also written below it. In this case, it is 2.55 %:
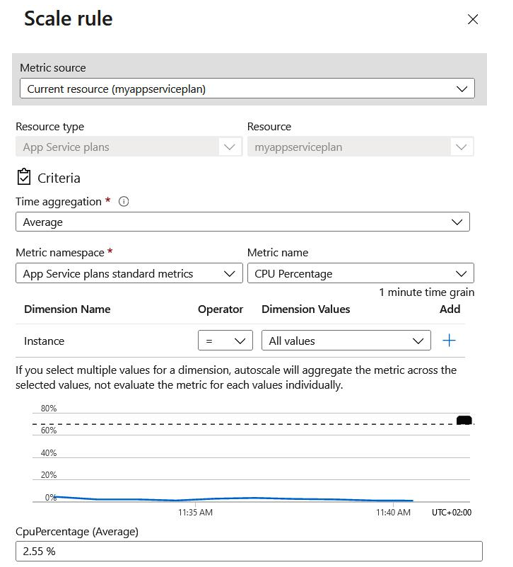
Figure 12.20 – Scale rule
- Below the CPUPercentage (Average) section, you will notice some other configuration options. Set Operator to Less than and Metric threshold to trigger scale action to 30. Then, set Duration (minutes) to 10 and Time grain statistic to Average. This will define a rule that states that when the CPU average percentage reaches less than 30% usage over 10 minutes, it will trigger an Action.
- For the Action section, set Operation to Decrease count by, Cool down (minutes) to 5, and Instance count to 1. This will decrease the instance count of the running web applications by 1 when the criteria that we configured in Step 11 have been identified. Once triggered, there will be a cooldown period where no further actions can be performed until the cooldown window has elapsed. In this case, it is 5 minutes. If the criteria for scaling are observed again after this cooldown period, then the action will be triggered again. Click Add:
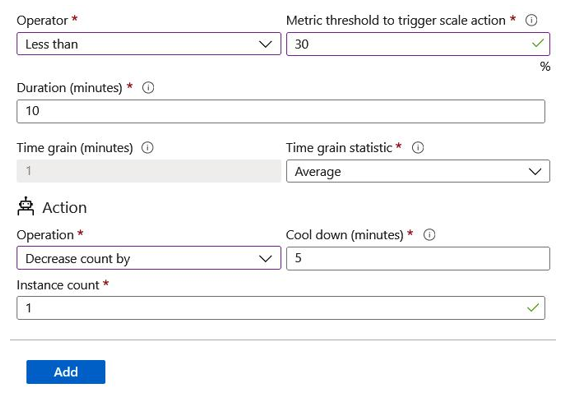
Figure 12.21 – Scale rule – Threshold and Action sections
- Click Save.
Now that you have configured your autoscale rules using the Azure portal, let’s learn how to use PowerShell to do the same.
More Details