Aug 8, 2021
Creating and configuring virtual networks, including peering 2 – Implementing and Managing Virtual Networking
One of the exam objectives for this chapter is to gain the ability to configure VNet peering. VNet peering is when two or more VNets are linked with each other so that traffic can be sent from one network to another. There are two types of VNet peering:
• VNet peering: Connects VNets with the same region. There is also a cost associated with inbound and outbound data transfers for VNet peering.
• Global VNet peering: Connects VNets across different regions. This is more costly than VNet peering within the same region.
When using the Azure portal to configure VNet peering, there are a few settings that you should be aware of:
• Traffic to a remote VNet: Allows communication between two VNets, as this allows the remote VNet address space to be included as a part of the virtual-network tags.
• Traffic forwarded from a remote VNet: Allows traffic forwarded by a VNet appliance in a VNet that did not originate from the original VNet to flow via VNet peering to the other VNet.
• Virtual network gateway or Route Server: This is relevant when a VNet gateway is deployed to the VNet and needs traffic from the peered VNet to flow through the gateway.
• Virtual network deployment model: Select which deployment model you want with the peered VNet. This will either be classic or the standard resource manager method.
Let’s go ahead and configure VNet peering. To do this, we need to create another VNet first using these steps:
- In PowerShell, use the following command:
Connect-AzAccount
- Next, the following command will create another VNet, which will include a subnet that links to the VNet in the same RG that we created earlier in this chapter:
$vnet = @{
Name = ‘DemoVNet_2’
ResourceGroupName = ‘VNet_Demo_ResourceGroup’ Location = ‘WestEurope’ AddressPrefix = ‘192.168.0.0/24’
}
$virtualNetwork = New-AzVirtualNetwork @vnet $subnet = @{
Name = ‘Main_Subnet’
VirtualNetwork = $virtualNetwork
AddressPrefix = ‘192.168.0.0/24’
}
$subnetConfig = Add-AzVirtualNetworkSubnetConfig @subnet $virtualNetwork | Set-AzVirtualNetwork
- Sign in to the Azure portal by visiting https://portal.azure.com and navigating to the RG:

Figure 14.5 – Both VNets showing in the Azure portal
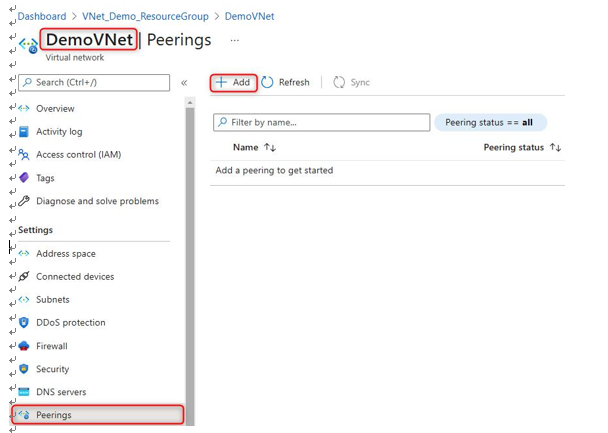
- Next, select DemoVNet, and under Peerings, select Add:

Figure 14.6 – Configuring VNet peering
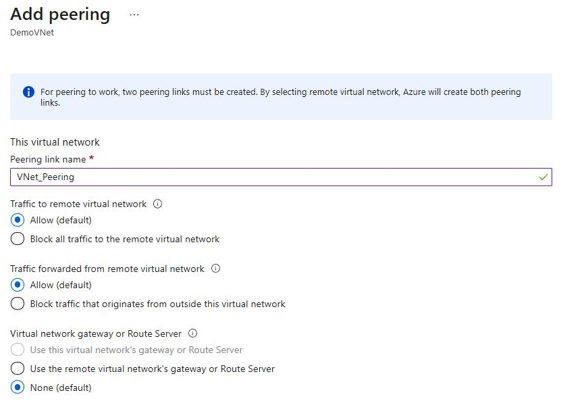
- Next, configure the peering link name, as shown in Figure 14.7, and set the following fields as Allow (default):
I. Traffic to remove virtual network
II. Traffic forwarded from remote virtual network
III. Virtual network gateway or Route Server:

Figure 14.7 – Configuring VNet peering for DemoVNet
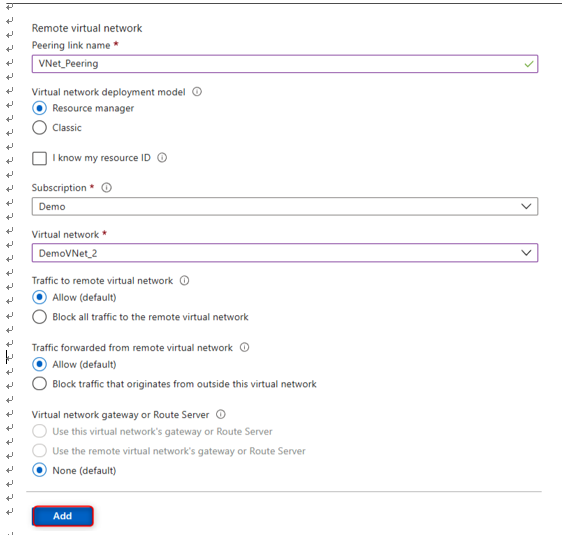
- Next, give the remote peering link a name of VNet_Peering, select the VNet, and configure the following fields as Allow (default):
I. Traffic to remove virtual network
II. Traffic forwarded from remote virtual network III. Virtual network gateway or Route Server Next, click on Add:

Figure 14.8 – Configuring VNet peering for DemoVNet_2
- Give the peering status a few minutes to enforce the peering. The final peering status will be Connected:

Figure 14.9 – Successfully configured peering between VNets
In this section, we had a look at how virtual networking works in Azure as well as how to create a VNet and subnet via PowerShell. We also had a look at how to configure VNet peering between two VNets.
We encourage you to read up on Azure virtual networking and VNet peering further by using the following links:
• https://docs.microsoft.com/en-us/azure/virtual-network/ quick-create-powershell
• https://docs.microsoft.com/en-us/azure/virtual-network/ manage-virtual-network
• https://docs.microsoft.com/en-us/azure/virtual-network/ virtual-network-peering-overview
More Details