Sep 4, 2024
Deploying AKS 2 – Creating and Configuring Containers
  1. Next, we have the Authentication tab; here, you will note we can modify the setting for the Authentication method type to either Service principal or System-assigned managed identity. This will be used by AKS for managing the infrastructure related to the service. For this exercise, we will leave this at its default setting. Then, you have the Role-based access control (RBAC) option. By default, this is set to Enabled; this is the best option to manage the service as it allows fine-grained access control over the resource; leave this as Enabled. You will also have the choice to enable AKS-managed Azure Active Directory. Checking this will enable you to manage permissions for users on the service based on their group membership within Azure AD. Note that once this function has been enabled, it can’t be disabled again, so leave this unchecked for this exercise. Finally, you have the option of the Encryption type value you want. For this exercise, leave it as the default setting. Click Next: Networking >. The process is illustrated in the following screenshot:

Figure 11.47 – Creating a Kubernetes cluster: Authentication tab

  1. For the Networking section, we will leave most of the settings as their default configuration. Note that for Network configurations we have two options here, one for Kubenet and another for Azure CNI. kubenet is a new VNet for the cluster whereby Pods are allocated an IP address and containers have network address translation (NAT) connections over the shared Pod IP. Azure Container Networking Interface (Azure CNI) enables Pods to be directly connected to a VNet. In association, this allows containers to have an IP mapped to them directly, removing the need for NAT connection. Next, we have the DNS name prefix field, which will form the first part of your FQDN for the service. You will then notice Traffic routing options available to us for the service—we will discuss this more in one of the next exercises, as well as the Security options available to us. Select Calico under Network policy. Click Next: Integrations >. The process is illustrated in the following screenshot:

Figure 11.48 – Creating a Kubernetes cluster: Networking tab

  1. On the Integrations tab, you will note the option to select a container registry. We will select the registry that we previously deployed. You will also note you have the option to deploy a new registry directly from this creation dialog. Next, we have the option to deploy container monitoring into the solution on creation. We will leave the default setting here, but monitoring will not be covered under the scope of this chapter. Finally, you have the option of applying Azure Policy directly to the solution; this is recommended where you want to enhance and standardize your deployments. This solution enables you to deliver consistently and control your deployments on AKS more effectively. Click Review + create, then click Create. The process is illustrated in the following screenshot:

Figure 11.49 – Creating a Kubernetes cluster: deployment

You have just successfully deployed your first Kubernetes cluster; you now know how to deploy and manage containers at scale and in a standardized way. Next, we will look at how we configure storage for Kubernetes and make persistent storage available to our solution.

More Details
Jun 4, 2024
Configuring storage for AKS – Creating and Configuring Containers

Configuring storage for AKS

AKS enables different storage options available for containers; you can leverage either local (non-persistent) storage or shared storage (persistent storage) for your containers through AKS. For persistent storage options, you can leverage Azure Managed Disks, which is primarily focused on premium storage solutions, such as for fast input/output (I/O) operations, as we discussed in Chapter 6, Understanding and Managing Storage. Azure File Shares is another option available and the default storage mechanism for enabling persistent storage on containers. This is typically cheaper to deploy and provides decent levels of performance for most workloads. For better performance, premium file shares can be used. Azure File Shares is also great for sharing data between containers and other services, whereas a managed disk will be restricted to a single Pod but is easier to deploy.

The following diagram illustrates the different storage options available:

Figure 11.50 – Kubernetes: Storage layers

In this exercise, we will configure shared storage using Azure File Shares in your AKS cluster. Proceed as follows:

  1. Sign in to the Azure portal at https://portal.azure.com.
  2. Create a storage account and a file share named fileshare01. Once created, note the primary storage account key.
  3. Launch Azure Cloud Shell and run the following commands. Replace the resource group name with your name and the AKS cluster name for the Name field:

Az login

Install-AzAksKubectl

Import-AzAksCredential -ResourceGroupName AZ104-Chapter11 -Name myfirstakscluster

  1. Modify the following script with your storage account name and storage account key, then paste it into Cloud Shell and press Enter:

kubectl create secret generic azure-secret –from-literal =azurestorageaccountname=storageaccountname –from-litera l=azurestorageaccountkey=storageaccountkey

  1. Navigate to the AKS cluster you created in the previous section. Click on Storage on the left menu, then ensure you are on thePersistent volume claims tab, and click Add, as illustrated in the following screenshot:

Figure 11.51 – Adding a persistent volume claim

  1. Click Add with YAML, as illustrated in the following screenshot:

Figure 11.52 – Add with YAML

  1. Paste or type the following YAML document into the window:

apiVersion: v1

kind: PersistentVolume

metadata:

name: azurefile

spec:

capacity:

storage: 5Gi

accessModes:

  • ReadWriteMany azureFile:

secretName: azure-secret

shareName: fileshare01

readOnly: false mountOptions:

  • dir_mode=0777
  • file_mode=0777
  • uid=1000
  • gid=1000
  • mfsymlinks
  • nobrl

Then, click Add, as illustrated in the following screenshot. Thiswill create your persistent volume:

Figure 11.53 – Adding a persistent volume using YAML

  1. Now, to create a persistent volume claim, click Add again, and paste the following YAML. Click Add:

apiVersion: v1

kind: PersistentVolumeClaim

metadata:

name: azurefile

spec:

accessModes:

  • ReadWriteMany storageClassName: “” resources:

requests: storage: 5Gi

  1. You now have a persistent volume claim. Click on the Persistent volume claims tab, as illustrated in the following screenshot:

Figure 11.54 – Persistent volume claims tab

  1. Note your persistent volumes by clicking on the Persistent volumes tab, as illustrated in the following screenshot:

Figure 11.55 – Persistent volumes tab

You have successfully added persistent storage to your AKS cluster. You now know the tasks involved to achieve this goal. In the next section, we will explore AKS scaling.

More Details
Jan 4, 2024
Upgrading an AKS cluster – Creating and Configuring Containers

Upgrading an AKS cluster

You have the choice to automatically upgrade your AKS clusters or to manually manage upgrades yourself. As part of your upgrade decisions, you can decide if you would like to upgrade both the node pools and control plane or the control plane only. Automatic upgrades have the option of choosing different channels that best apply to your requirements; these are listed as follows:

• None: Used for disabling auto upgrading.

• Patch: The cluster is automatically updated to the latest support patch version.

• Stable: The cluster is automatically updated to the latest stable version.

• Rapid: The cluster is automatically updated to the latest N-2 minor version.

• Node-image: The cluster is automatically updated to the latest version available.

Top Tip

It’s important to note that when upgrading your AKS clusters, you will upgrade to a supported patch version for your cluster, one version at a time where more than one version upgrade exists.

We will now perform the exercise of upgrading your cluster with the following steps:

  1. Sign in to the Azure portal at https://portal.azure.com.
  2. Navigate to the AKS cluster you created in the previous section. On the left menu, select the Cluster configuration option and click Upgrade version on the right, as illustrated in the following screenshot:

Figure 11.62 – Cluster configuration

  1. Select your desired Kubernetes version and select an Upgrade scope type, then click Save. The process is illustrated in the following screenshot:

Figure 11.63 – Upgrading the version of Kubernetes

You have just successfully upgraded your Kubernetes version and understood the various automated options also available to do this. Next, we will run through the chapter summary and all that we have covered in this chapter.

Summary

In this chapter, we discovered what containers are and how we deploy and manage them, we learned about Docker, the limitations of Docker, and container deployments, and finally, we found out how we can extend default container services through orchestration tools such as Kubernetes that greatly enhance the way we manage and scale containers. As part of your learning, you have discovered how to work with ACI Instances and learned how to also attach persistent storage to containers using AKS, how to enhance the security around containers, and about the various networking options available to you as part of AKS. You also experienced working with deployments and administrative tasks such as creating an Azure container registry, deploying Azure container instances, and creating and configuring Azure container groups.

You should now feel confident about the administration of containers within Azure, the methods of deployment, and how to orchestrate and manage these.

In the next chapter, we will explore Azure App Service, what this is, how to configure and deploy it, and becoming confident in how to use this on Azure.

More Details
Mar 1, 2023
PowerShell scripts – Creating and Configuring App Services

PowerShell scripts

Please ensure that the Az module is installed, as per the Technical requirements section at the beginning of this chapter.

Here, we are going to create an App Service plan and Web Apps service via PowerShell.

To do so, follow these steps:

Note: Change the parameters to suit your requirements

  • First connect your Azure account using your credentials Connect-AzAccount
  • Parameters

$ResourceGroup = “AZ104-Chapter12”

$Location = “WestEurope”

$SubscriptionId = “xxxxxxx”

$WebAppName = “mysecondwebapp10101”

$AppServicePlanName = “mylinuxappserviceplan10101”

  • If necessary, select the right subscription as follows Select-AzSubscription -SubscriptionId $SubscriptionId
  • Create a resource group for the Availability Set as follows

New-AzResourceGroup -Name “$ResourceGroup” -Location “$Location”

# Create an App Service Plan for Linux

New-AzAppServicePlan -Name $AppServicePlanName -Tier Standard -Location $Location -Linux -NumberofWorkers 1 -WorkerSize Small -ResourceGroupName $ResourceGroup

# Create a Web App

New-AzWebApp -Name $WebAppName -ResourceGroupName $ResourceGroup -Location $Location -AppServicePlan $AppServicePlanName

Just as you did previously, you can browse to the web application’s URL and see the same screen you did prior. With that, you have just completed your first few web application deployments to Azure using the Web Apps service. You should now feel confident in deploying web applications when required in Azure, either through the portal or through PowerShell. Next, you will learn how to scale your applications.

Configuring the scaling settings of an App Service plan

In this exercise, you will configure the scaling settings for the App Service plan you created previously. Recall that we mentioned that there are two different types of scaling options you can choose from. Horizontal scaling (Scale out in the application menu) refers to the number of app services that have been deployed, while vertical scaling (Scale up in the application menu) refers to the size of the VM hosting the web app service. The VM refers to the App Service plan. As you may recall, we have the option to choose an SKU and size when we deploy that refers to the specifications for the App Service plan that we would like to have. First, we will explore Scale up:

  1. Navigate to the App Service plan you worked on in the previous exercise.
  2. From the left menu blade, underSettings, click Scale up (App Service plan).
  3. You will be presented with a screen containing different SKU sizes that you can choose from. The top bar represents the category that identifies the SKUs that are suitable for the type of workloads you will be deploying, such as dev/test and production.

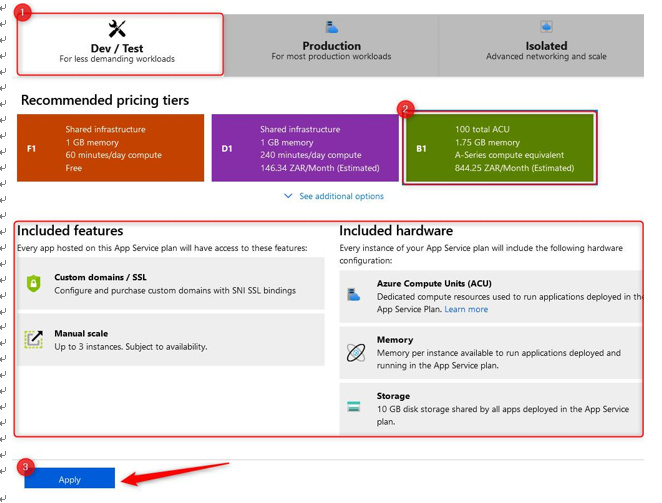
The Isolated environment is a more secure environment that deploys a set of resources that are isolated from the shared server environment you typically consume from; this will cost more to deploy as you will be the only one utilizing the server resources you are looking to consume for the applications in your service plan. Select Dev / Test and then select B1 as the SKU size. Note that the bottom part of the screen will display the features and hardware that are included related to the SKU you’ve selected. Also, note that under the SKUs, you have the option to See additional options. Click Apply:

Figure 12.12 – Scale up

More Details
Jan 15, 2023
Securing an app service 4 – Creating and Configuring App Services
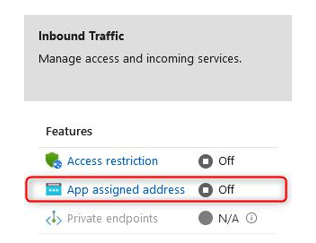
  1. The next configuration for inbound traffic isApp assigned address. Clicking this option will take you to the TLS/SSL settings blade. This is used to determine your Custom Domain, which we will configure in the next section. This is another method of enhancing security as the domain can be configured to something that is trusted by your organization or users. It will confirm that you are using certificate delivery to enhance the security of your application:

Figure 12.35 – Network settings – Inbound Traffic 2

  1. The last inbound configuration option is Private endpoints. Selecting this allows you to completely remove all public access to your application. Your application will be assigned an NIC with a private IP from the associated VNet and subnet you connect it to. To enable public access for this configuration, you would need some form of network address translation (NAT) configuration to reach your application. This can be achieved by deploying an Application Gateway or using Azure Front Door, or by using your firewall service to translate traffic from one of its public IP addresses to your application over the private endpoint. This is a great way to secure traffic to your application, but as you can see, it can quickly cause complications. This setting will force you to consider how other components of your application communicate with each other and the outside world.
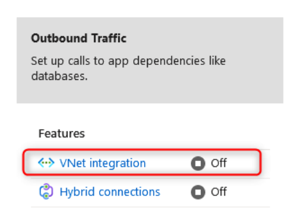
  2. For outbound communication, you can perform VNet integration, which will associate your application with a designated subnet. Note that to assign a web app to a subnet, it will need to assume delegated access for the subnet. This means that it can manage the DHCP deployment for the subnet and will be responsible for IP assignment on the subnet. Furthermore, it restricts what can access the subnet and limits you to which subnet can be used for what service as only a single service can have delegated administration. Note that this is for outbound communication only and will not protect inbound communication. The subnet should also be allowed to communicate with the relevant services within Azure. Click VNet integration:

Figure 12.36 – Network settings – Outbound Traffic 1

  1. Click + Add VNet:

Figure 12.37 – VNet Configuration

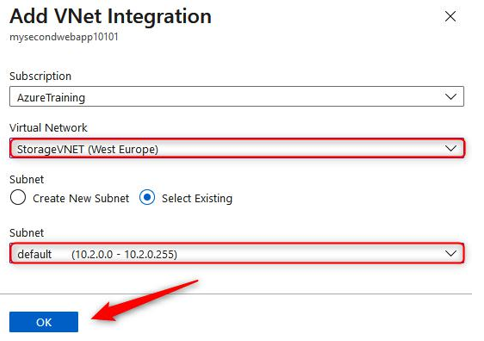
  1. You can also select an appropriate Virtual Network, which will give you the option to either create a new subnet or use an existing one. Use whichever best suits this demo and click OK:

Figure 12.38 – Add VNet Integration

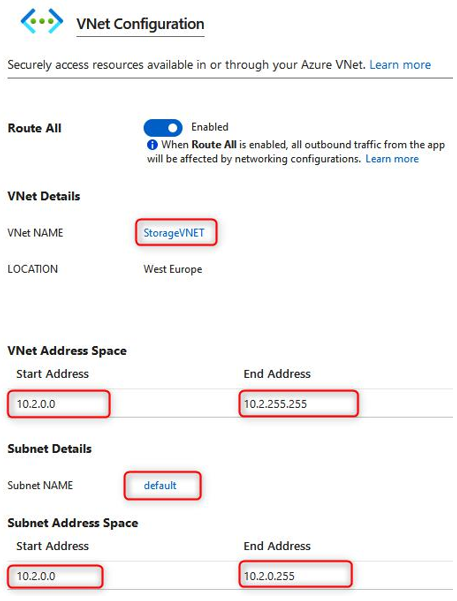
Note that your application is now connected to the VNet and subnet you selected. Note the address details as well. Traffic from your application can now be controlled for outbound traffic using user-defined routes (UDRs) on the network:

Figure 12.39 – VNet Configuration

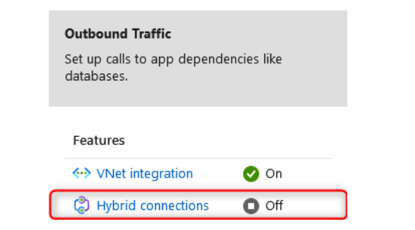
  1. The last configuration item for outbound traffic isHybrid connections. This feature is a service that enables endpoint connectivity for your application and provides
    a connection solution where you don’t have direct access paths to your on-premises environments or other environments from Azure. It enables a mechanism for TCP communication that’s mapped to a port number for that corresponding system or service. Each hybrid connection is associated with a single host and port that enhances security as it’s easier to manage and correlate the traffic:

Figure 12.40 – Network settings – Outbound Traffic 2

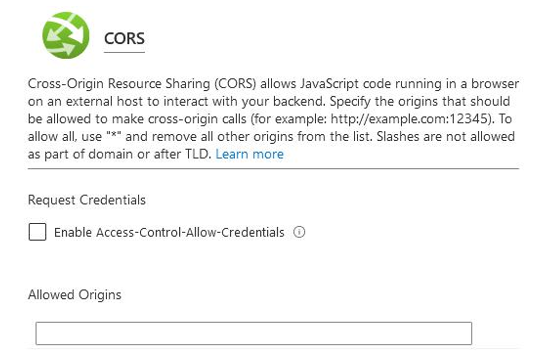
The final security configuration item to be aware of is the CORS option under API context on the left menu pane. CORS should be disabled unless it’s required as it exposes more vulnerabilities to your application, especially when it’s not managed correctly:

Figure 12.41 – Network settings – CORS

Now that you have reviewed the different security settings, you should feel more familiar with the controls that are available and when to use them. It’s especially important to understand the configurations that are relative to traffic flow. In the next section, you will learn how to configure custom domain names.

More Details
Jan 12, 2023
Securing an app service 3 – Creating and Configuring App Services
  1. You can also consider using backups and disaster recovery (DR) for your applications. But why? If your application becomes compromised and you need to perform restoration tasks, without backups, you would potentially lose all your critical data. Therefore, anything that could cause the application to go offline or become inaccessible would compromise the security of the application. The same is true for DR; if you can’t restore an active instance of the application, its security is compromised as potential usage of the application will be restricted, which could lead to several other issues for an organization and a loss of revenue.
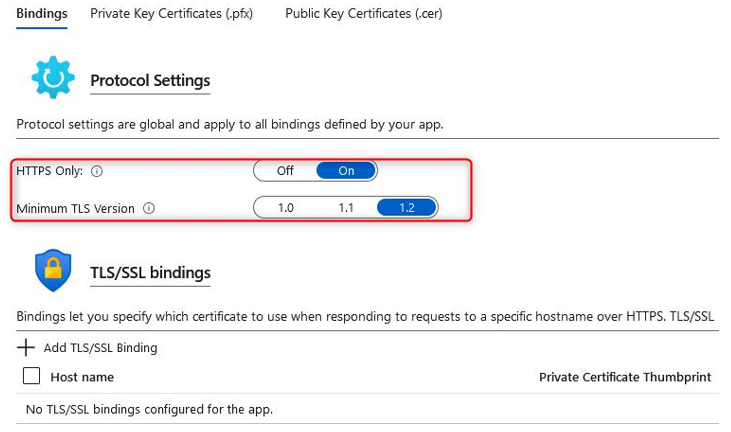
  2. The next menu you should click through is TLS/SSL settings. On this blade, select the Bindings tab and ensure that HTTPS Only is set to On. This ensures that all your traffic is encrypted and secured to the application, where HTTP traffic allows compromises to occur and should always be configured to forward all HTTP requests to HTTPS. HTTP communicates in clear text, so any credentials or sensitive information that’s sent would be visible to anyone that could intercept the traffic, which is highly insecure. HTTPS requires a certificate, which can be configured within the same blade. Azure offers one free certificate per web application for a single domain:

Figure 12.31 – Protocol Settings – TLS/SSL bindings

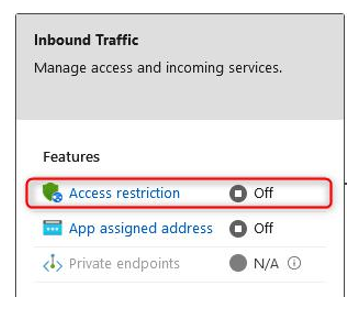
  1. Next, click on the Networking option from the left menu of the application. Networking is an interesting topic for your applications and can result in many sleepless nights if it’s not planned and managed correctly. The rule of thumb for hardening your network is to secure your perimeters and isolate traffic via perimeters, as well as by adopting the Zero Trust model (where you don’t trust any application or service that doesn’t intend to communicate with the application). It should only be public-facing if your application requires public access. You will also want to consider a Web Application Firewall (WAF) and firewall service for public traffic, as well as something internal. Azure provides several options for privatizing traffic for your application and it’s important to understand your traffic flow when you’re considering your implementation. The first item you must configure here is Access restriction, which applies to inbound traffic. This will act as a whitelist or blacklist for your traffic, depending on how you configure your rules. To configure this, click Access restriction:

Figure 12.32 – Network settings – Inbound Traffic 1

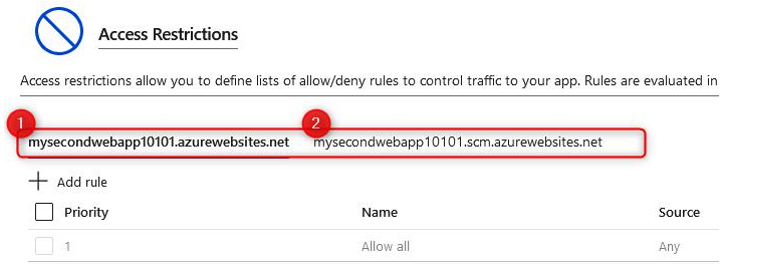
  1. As the most secure option, you should restrict all traffic except for your allowed rules. You will notice that you can configure your restriction rules for two different endpoints. The first is the public endpoint for your application, while the second has a suffix starting withscm, which is used for the Kudu console and web deployments. To see the available configuration options, click + Add rule:

Figure 12.33 – Network settings – Access Restrictions

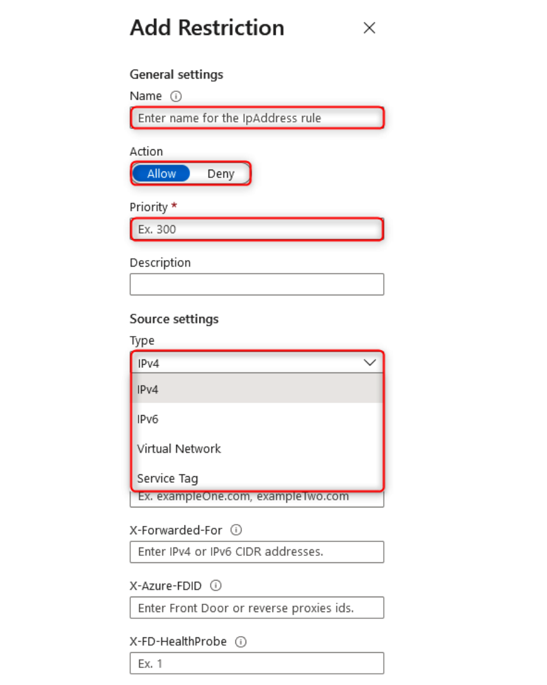
  1. On the Add Restriction pane that appears, you can set a Name; enter something meaningful. Next, you must decide on an Action, which can be either Allow
    or Deny; click Allow. You can also enter a Priority and, optionally, a Description. The next option, Type, is very important as it is used to determine the type of restriction that’s being implemented and how the rule is invoked. The default configuration is IPv4, which is limited to a known IPv4 address or range (usually a public address or range) and is added to the IP Address Block text box. When entering a range, you can enter it in CIDR notation, with a single IP being /32 for the CIDR. Enter an IP address. IPv6 works in the same fashion except for IPv6 addresses or ranges. The Virtual Network source option allows you to select a network that you have configured previously to allow traffic through. The final option is Service Tag. Click Add rule:

Figure 12.34 – Add Restriction

More Details
Sep 4, 2022
Configuring a backup for an app service – Creating and Configuring App Services

Configuring a backup for an app service

Your application is running well, but you’re concerned that if something should fail or data is lost, you can’t restore your application. You decide that backing it up is a good idea and start to explore different ways to back up your application. Thankfully, Azure makes this a simple process, where you just need to think about what your backup strategy needs to look like and then configure the service accordingly. Remember that using a backup is different from performing DR in that DR restores operational services, whereas backups enable point-in-time restorations of data to recover from loss or accidental deletion. Follow these steps to configure a backup for your application:

  1. Navigate to the App Service plan you worked on in the previous exercises.
  2. From the left menu blade, underSettings, click Backups. From the blade that appears, click Configure at the top of the screen. The Backup Configuration blade will appear.
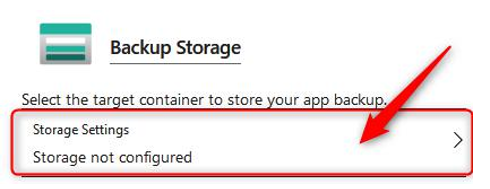
  3. You will need a storage account to store your backups. Since we haven’t pre-created an account, we will create it as part of this exercise. Click the Storage Settings button:

Figure 12.49 – Storage Settings

  1. Create your storage account and click OK. Next, you will be prompted for a container. Currently, this doesn’t exist since we created a new storage account. Click + Container, name the container backups, and click Create. Click the new container and click Select.
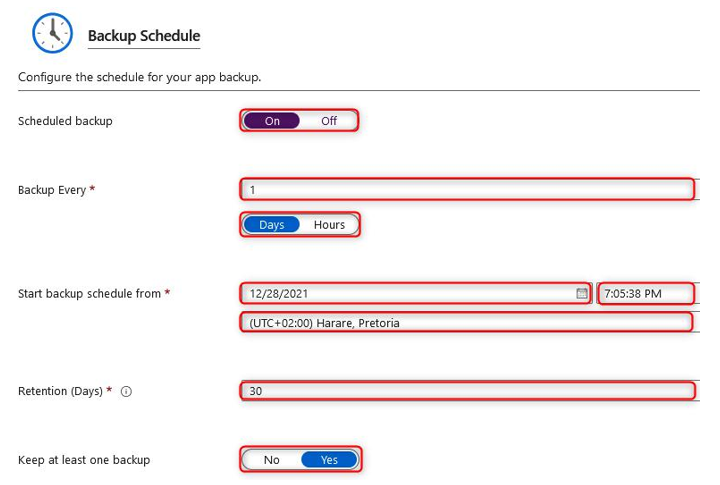
  1. For backups, you have the option to decide if you would like an automated schedule or if you would like to manually back up as and when needed. Preferably, you would like an automated schedule that prevents mistakes from occurring, such as forgetting to back up. Enable Scheduled backup. Configure your backup so that it runs every day at a set time from the date you would like this to start. In this example, we have set this to 28/12/2021 at 7:05:38 pm. Set your Retention period (in days) and set Keep at least one backup to Yes:

Figure 12.50 – Backup Schedule

  1. Note that you also have the option to configure a backup for your database. We won’t configure this for this exercise. Click Save:

Figure 12.51 – Backup Database

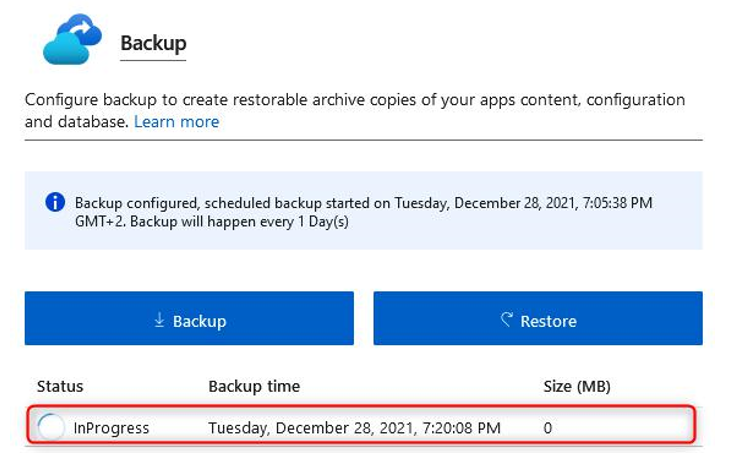
  1. You will see that your first backup is currently in progress and that the light blue box reflects the configuration for your backup schedule. You will also see two other blue buttons; the first, Backup, is for manually initiating a backup to be performed, while the other, Restore, allows you to recover data when required:

Figure 12.52 – Backup overview

You now understand how to back up your Azure App Service and should feel confident in configuring this going forward. In the next section, you will learn about the various network settings. Since we covered some of the available networking configurations in the previous sections, we will focus predominantly on how to configure a private endpoint.

More Details
Jul 14, 2022
Configuring networking settings – Creating and Configuring App Services

Configuring networking settings

You learned how to perform VNet integration in the Securing an app service section. In this section, you will learn how to configure behind a private endpoint:

  1. Navigate to the App Service plan you worked on in the previous exercises.
  2. From the left menu blade, underSettings, click Scale up (App Service plan). On the blade that appears, ensure that you have chosen the Premium V2, Premium V3, or Elastic Premium SKU to continue with this exercise. Click Apply.
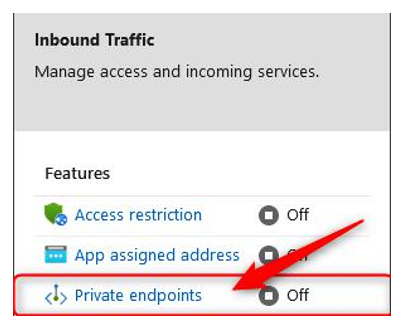
  3. From the left menu blade, underSettings, click Networking. From the blade that appears, click Private endpoints in the Inbound Traffic section:

Figure 12.53 – Private endpoints

  1. Click Add:

Figure 12.54 – Private Endpoint connections – Add

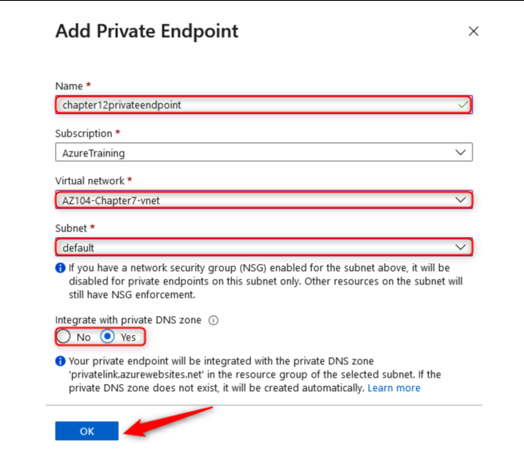
  1. Enter a Name, ensure that you have the right Subscription selected, and select the correct Virtual network your private endpoint will be connecting to. Then, select a Subnet you would like to connect to. Finally, select Yes for Integrate with private DNS zone. Thisfeature allows Azure to create a Fully Qualified Domain Name (FQDN) for your private endpoint that can be reached by your resources. If you select No, then you will need to ensure that your DNS zone is maintained by another DNS service, such as Active Directory (on-premises version), and configured on your VNet for DNS lookup queries to forward to your DNS server(s):

Figure 12.55 – Add Private Endpoint

  1. On the Private Endpoint connections screen, which you will see after deploying your resource, click on the new endpoint you have created. Click the name of your Private endpoint (where the text is highlighted in blue) to open the Private endpoint blade:

Figure 12.56 – Backup overview

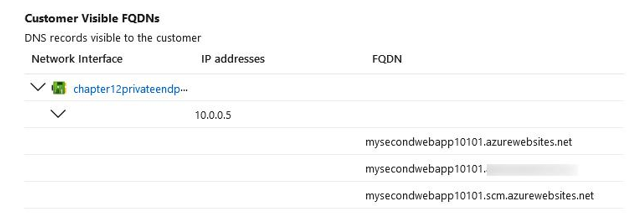
  1. From the left menu blade, under theSettings context, click Networking. From the blade that appears, scroll down to Customer Visible FQDNs and note the FQDN names associated with your service. Note that these are now associated with a private IP that belongs to the subnet you selected previously:

Figure 12.57 – Customer Visible FQDNs

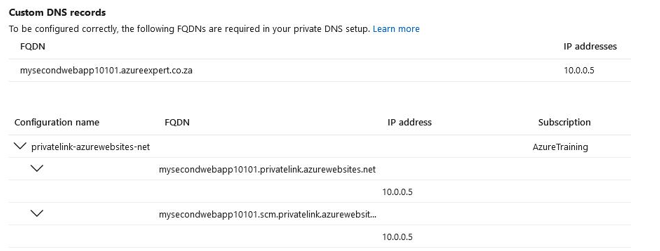
  1. Scrolling down further, you will see Custom DNS records. Note that the FQDN variable that’s been assigned is very much the same as the website FQDN you have for azurewebsites.net, except it also contains privatelink as a prefix. So, you now have an FQDN of [app name].privatelink.azurewebsites. net. This is also associated with the private IP we saw previously. Note that if you performed an NSLookup on the preceding FQDNs, you will get a public IP address for your service:

Figure 12.58 – Custom DNS records

  1. Attempting to access your site now will deliver a 403-Forbidden error since public access is now revoked:

Figure 12.59 – Error 403 – Forbidden

Top Tip

If you have applied DNS to the VNet you are associating with and have configured a private DNS zone, you will need to ensure that your DNS servers have been configured to forward lookup to Azure for the private endpoint namespace related to your service.

With that, you have just configured a private endpoint and should feel confident in how to deploy one. You are also aware of some of the DNS complexities you should look out for to ensure you can resolve the host correctly by your resources.

More Details
May 4, 2022
Configuring deployment settings – Creating and Configuring App Services

Configuring deployment settings

There are several deployment settings related to your app service that you should be aware of. These allow you to upload your code or manage source control and deployment slots.

Deployment slots are logical segmentations of your application that can pertain to different environments and versions. Let’s say you have an application that is running in production mode (meaning it’s live and operational), and you want to work on some new code updates to introduce new features to the next version of your application. Typically, you would work on this in a test environment and deploy it accordingly to the production environment, once you felt that adequate testing had been performed before deploying anything to production.

Well, deployment slots provide a solution that allows you to deploy code to these slots to test the different functions and features of your applications, as well as code updates. You can run your primary deployment slot as the native application and deploy additional slots, such as TEST, that can be used for your new code. You have the option to swap deployment slots and revert at any time. The transition period is quick and enables a different paradigm in app management. You can, for instance, switch to the TEST slot and find that your application is not connecting to the required services and is slow. In this case, you can quickly flip back to the original code you had before any changes were made.

Let’s look at a brief configuration of a deployment slot before proceeding to the next part of this section:

  1. Navigate to the App Service plan you worked on in the previous exercises.
  2. From the left menu blade, underDeployment, click Deployment slots.
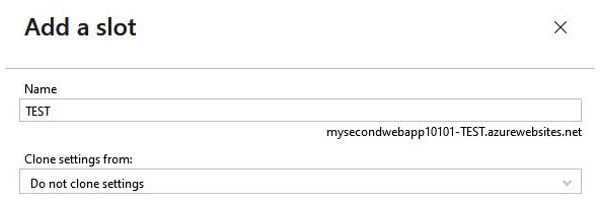
  3. From the top of the blade, click + Add Slot. Enter a Name – in this case, TEST – and leave Clone settings from set to Do no clone settings. Click Add, then Close:

Figure 12.60 – Add a slot

  1. The name you chose previously will form part of the FQDN for the deployment slot so that it can be accessed as a normal application, as shown in the preceding screenshot.
  2. Click Swap and set your Source as the new deployment slot you just created, and Target as the current slot. Click Swap, then Close:

Figure 12.61 – Swap

Now that you know about deployment slots, let’s explore the Deployment Center:

  1. Navigate to the App Service plan you worked on in the previous exercises.
  2. From the left menu blade, underDeployment, click Deployment Center. Click the Settings tab.
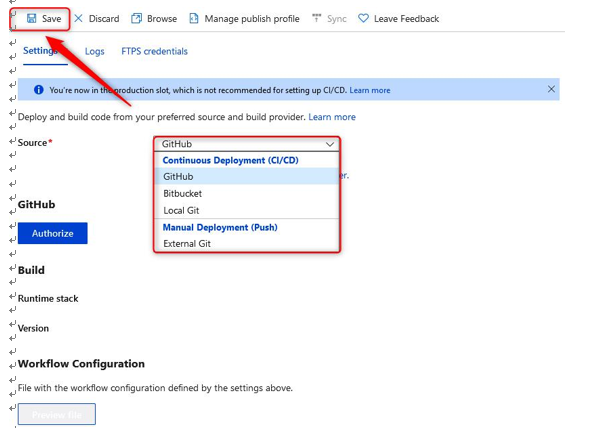
  3. Here, you have the option to deploy code from a Continuous Integration/ Continuous Deployment (CI/CD) tool. At the time of writing, the available options are GitHub, Bitbucket, and Local Git. Once you have chosen your Source CI/CD tool, you must Authorize your account and click Save:

Figure 12.62 – Deployment Center – Settings

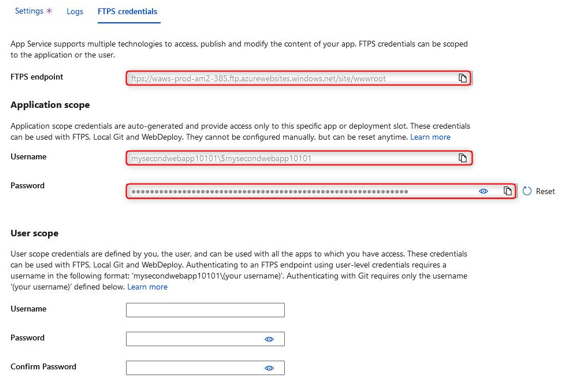
  1. Click the FTPS credentials tab and note FTPS endpoint. Application scope is an automatically generated Username and Password that’s limited to your application and deployment slot. You can use this to connect to your FTPS endpoint. You can also define a User scope and create a username and password:

Figure 12.63 – Deployment Center – FTPS credentials

With that, you have learned about the deployment settings that are available to you for your app services. You should now feel comfortable navigating this component of Azure App Service as you know where to integrate CI/CD and where to find your FTPS credentials so that you can modify your application code. Next, we will summarize what we covered in this chapter.

Summary

In this chapter, we covered what an App Service is within Azure, the role of App Service plans and why they are essential to your App Service, and how to deploy an application, including how to manage its settings and configurations and how to secure it. Then, we explored and discussed various networking configurations for your application and the considerations you need to have when configuring these settings. You should now feel confident working with applications on Azure using App Service.

In the next chapter, we will cover some examples of deploying and managing compute services within Azure. There will be a VM lab, a container lab, and an App Service lab. After following these examples, you will feel more comfortable working with Azure compute services.

More Details
Oct 4, 2021
Deploying Web App service lab – Practice Labs – Deploying and Managing Azure Compute Resources

Deploying Web App service lab

In this lab, you will be guided through the deployment of an Azure container instance with using a Docker image as the source. Finally, you will test connectivity to your containers to prove a successful deployment.

Estimated time: 30 minutes.

Lab method: PowerShell and the Azure portal.

Lab scenario: In this lab, you play the role of an administrator who is looking to utilize Azure App Services for hosting your company’s web applications. Your organization, Contoso, has several websites running in on-premises data centers on servers using a PHP runtime stack. Furthermore, you are looking to start using DevOps practices within your organization and want to use app deployment slots to improve your deployment strategy.

Visit the following URL to the official Microsoft Learning GitHub labs, where you will be guided through each task step by step to achieve the following objectives.

Lab objectives:

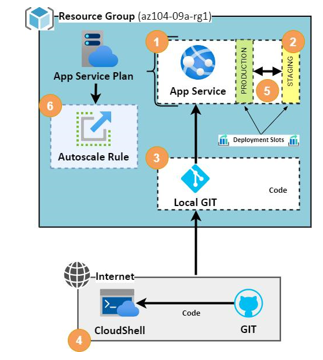
I.  Task one: Deploy your Web App and Service plan.

  1. Task two: Create a staging deployment slot for your web app.

III. Task three: Configure deployment settings for the local Git.

IV. Task four: Deploy your staging code.

V. Task five: Swap the staging and production deployment slots.

VI. Task six: Configure autoscaling and test your web app.

Lab URL: https://microsoftlearning.github.io/AZ-104-MicrosoftAzureAdministrator/Instructions/Labs/LAB_09a-Implement_Web_Apps.html.

Lab architecture diagram: The following diagram illustrates the different steps involved in the exercise:

Figure 13.6 – Deploying an Azure web app – architecture diagram

You have now experienced working with Azure web apps on the Azure portal as well as configuring autoscale rules. You should now feel confident in using this service within your daily role. It is best practice to remove unused resources to ensure that there are no unexpected costs.

Summary

In this chapter, we looked at several compute infrastructure type deployments. We explored the deployments of app services, Azure Container Instances, Azure Kubernetes Service, and VM deployments. We also looked at how to scale and manage these systems through a practical demonstration. You should now feel confident in managing Azure compute resources and working with these on Azure.

In the next part of the book, we’ll cover the deployment and configuration of network-related services and components. We will explore the management of Azure virtual networks and securing services. We will then explore the load balancing services available to us, and finally, how to monitor and troubleshoot network-related issues.

More Details