Jan 11, 2023
Securing an app service 2 – Creating and Configuring App Services
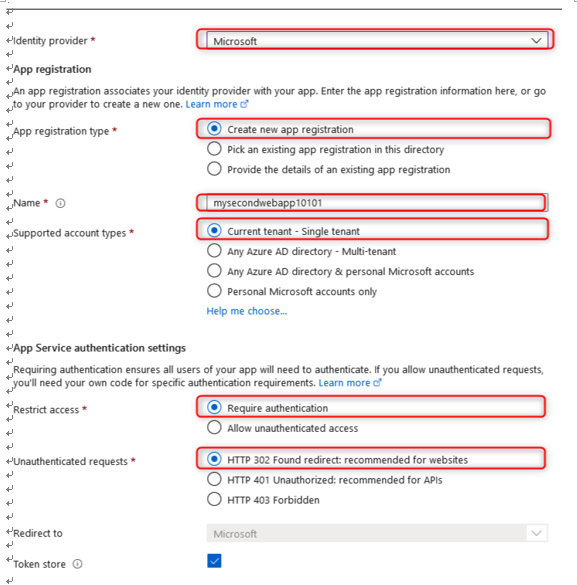
- You will see a screen with additional configuration settings. The first item to configure is the application registration. This can be used to assign permissions and will configure a service principal account in Azure AD called an app registration. For this exercise, select Create new app registration and assign a name. Next, select the option for supported account types for your application. Depending on how and where your application is used, this will dictate the configuration that best suits your security requirements. For instance, if you are looking to deliver an internal application such as something that lists the mobile numbers of employees within your organization so that you can contact someone urgently (where sharing this information is disallowed publicly), then you would want to restrict public access (that is, anyone external to your organization).
Using your identity provider will help you determine if they have an account with your organization or not. In such cases, you can select Current tenant – Single tenant. Any Azure AD direction – Multi-tenant will allow you to accept user logins from any other Azure AD directory. The next option, Any Azure AD directory & personal Microsoft accounts, opens access to public accounts too, where personal accounts can be used. Finally, Personal Microsoft accounts only removes access from other Azure accounts and limit this to personal Microsoft accounts. This is typically used for gaming services, whereyou want to allow friends to connect but you also want to restrict business accounts from accessing the service. As you can see, the most secure option is Current tenant – Single tenant. You can also configure Restrict access, where you can force authentication to be conducted before access is granted to your application. Unauthenticated access allows users to log in anonymously. Choose Require authentication since this is the most secure option. Finally, you can choose what kind of error handling you would like to deliver upon detection, such as delivering an HTTP 401 Unauthorized error message. Select HTTP 302 Found redirect. Then, click Next : Permissions >:

Figure 12.27 – Identity provider configuration
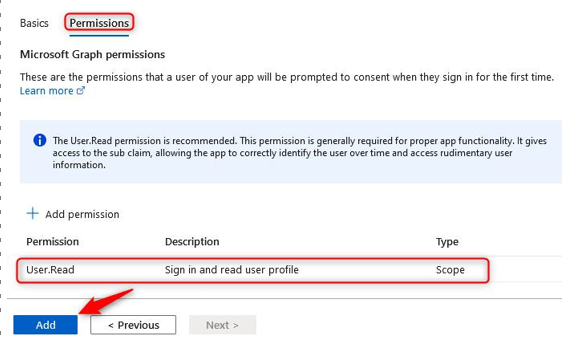
- The next blade relates to the Permissions options you would like to grant. The default option is User.Read, which allows the application to read the user’s profile. These permissions can be modified as needed to deliver the required information to your application. These permissions will be prompted by the user when they access the application and are being authenticated. They will need to consent to this permission request if they wish to access the application. Click Add:

Figure 12.28 – Identity provider – Permissions
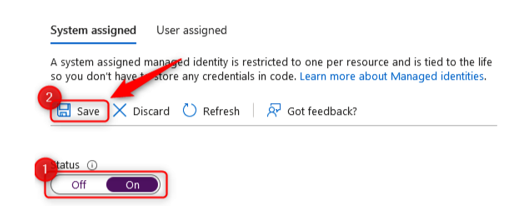
- Click Identity from the left menu pane for the application. You will be presented with two tabs – System assigned and User assigned. Here, you can choose which deployment configuration you would like to use. System assigned allows you to create a managed identity whose life cycle is controlled and managed by Azure. A managed identity allows you to grant RBAC permissions to the application as if it were a user, which gives them better control over resources and prevents user management issues such as abuse of privileges or mistakes being made. Enabling this setting increases the security of your application and prevents credentials from being injected directly into code, which would allow account and system compromise to occur. User assigned is managed manually but can be configured more granularly for control over the specific RBAC permissions you would like to grant to the application. On the System assigned tab, click On under the Status option, then click Save:

Figure 12.29 – System assigned
- After clicking Save, you will see a new configuration option, where you can configure the Azure RBAC permissions for your application:

Figure 12.30 – Adding a role assignment
More Details